Darwin Cloud (Formerly known as Transaction Plan)
This guide covers Darwin Cloud—our updated platform for tracking transactions and viewing reports. Inside, you’ll find step-by-step instructions on how to log in, navigate the system, and access key reports. We've also included a list of frequently used reports to help you get the most from Darwin Cloud.
Darwin Cloud (formerly TransactionPlan) is an enhanced business tracking platform, offering powerful tools for performance reporting, billing, and more.
With Darwin Cloud, you can:
- Access dashboards and reports to track your performance, recent billing, and other key metrics.
- Easily pay your agent bill by credit card through the Tools menu.
For more details on each feature, refer to the final sections of this guide, including the Reports and Tools menus. With Darwin Cloud, you have a comprehensive hub to streamline your business activities and stay organized.
Step 1: Follow the steps below to access your account to log in and view your reports:
Your Darwin Cloud username and password are the same as your Transaction Plan login.
Use these credentials to access the program through any of the following options:

NOTE: If you don’t remember your login, please contact your Agent Support Manager (ASM) for assistance with your username.
To reset your password, click the “Forgot Password” button and enter the email associated with your commission notices or monthly agent billing. You’ll receive a password reset link in your inbox. Your new password must include: At least 8 characters, 1 uppercase letter, 1 lowercase letter, 1 number, and 1 special character (e.g., !, @, #, $)
Step 2: Access your Dashboard
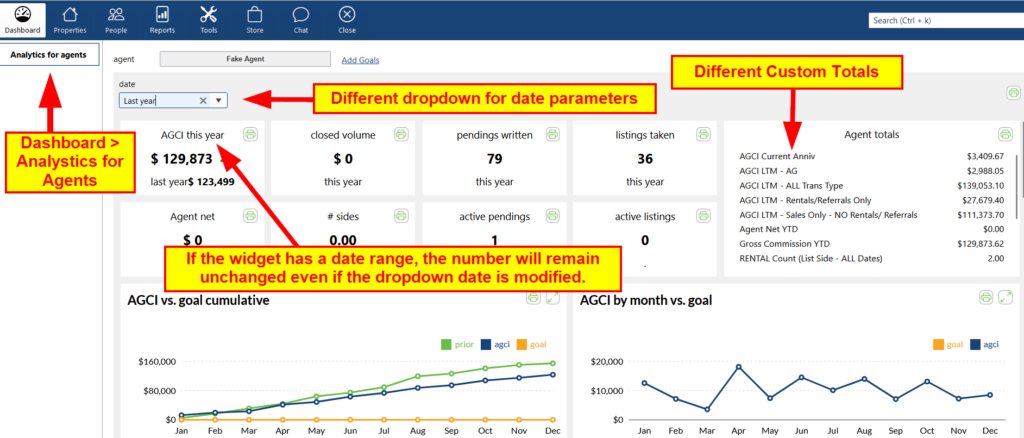
One of the features of Darwin Cloud is the Agent Analytics Dashboard, where you can view widgets displaying your production data, charts, and totals. You can adjust the date using the dropdown menu. The “Agent Totals” section provides an overview of various custom totals, and for more detailed insights, you can run reports under the “Reports” tab.

Step 3: Access Your Company Reports
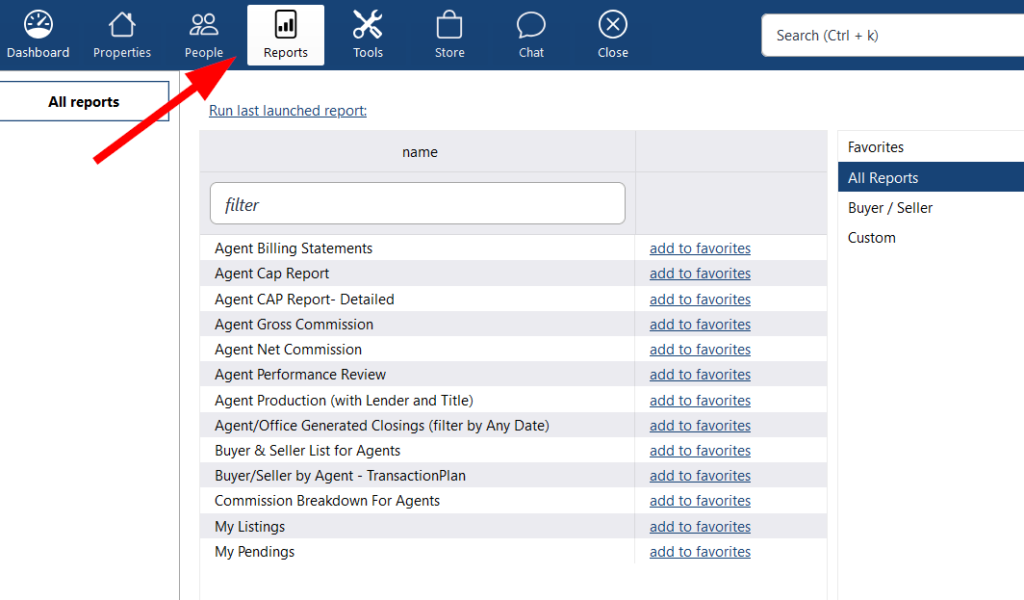
Go to Reports menu, click “ALL” to show all available reports.

Note: This list will grow when we create more reports that can be beneficial to your business.
Step 4: Important Notes Before Running the Reports
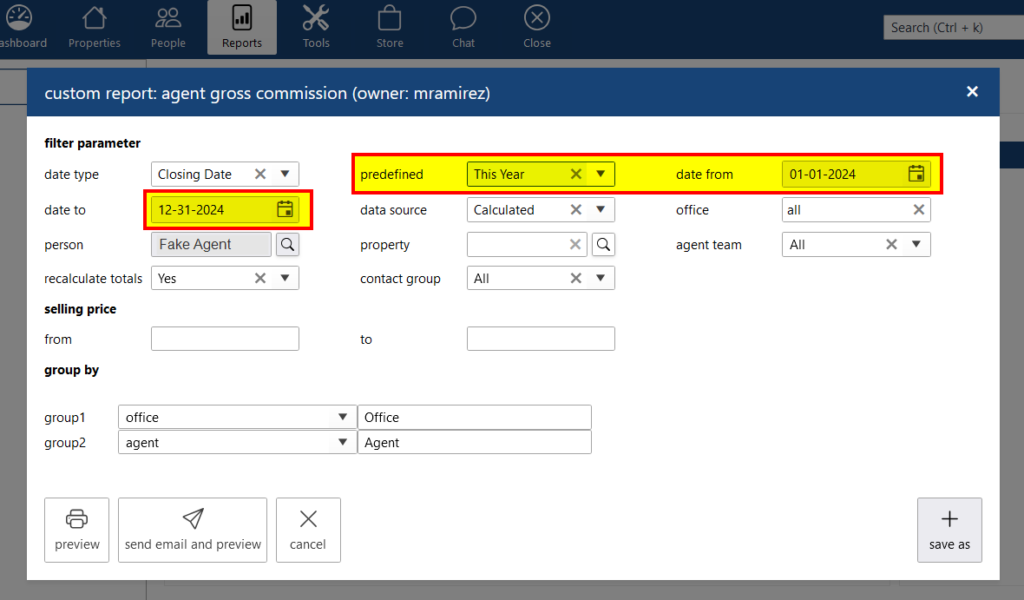
When running reports, it’s recommended to adjust the predefined dates and filter parameters. You can customize filters by side, lead generator, source, and more based on your needs.

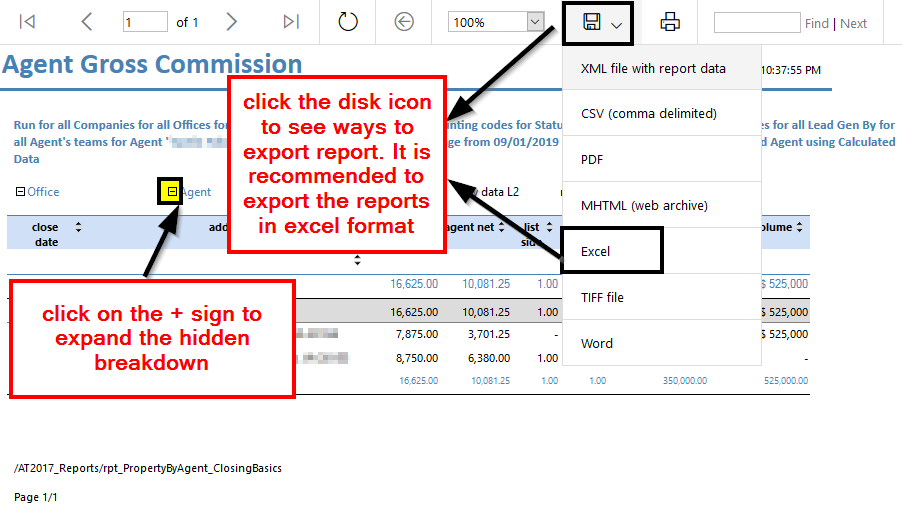
***Once the report view is available, click on the + (plus) button on top of the row headers to expand hidden breakdown. You can also export the reports by clicking on the disk button then select Excel.

Step 5: Report Definitions
- Agent Billing Statements: A running total of any company paid agent expenses along with Total Due. This can be pulled by date range.
- Agent CAP Total: A report that shows a list of closings that is counting the Company $ amount paid into your CAP within the Anniversary year.
- Agent Gross Commission: List of Gross Commissions that can be filtered by date range.
- My Listings: Current Active Listings
- My Pendings: Current Pendings (transactions under contract status) that can be filtered by date range for the close date.
- Agent Net Commission: Your Net Commissions Earned that that can be filtered by date range for the close date.
- Agent Performance Review: Your Business Planning Production Report that includes – multiple years of production & analytics, current pendings/listings, source of business, and goal charts. Track your business and goals all year long!
- Buyer & Seller List for Agents: List of your clients. This can be filtered to any date range or side (list, sell, all) and other preferred parameters. This report can be exported in excel then can be used to upload contacts in the CRM.
- Commission Breakdown: This shows the details of your closings with breakdown of all the deductions from each property.
- Agent/Office Generated Closings (filter by Any Dates): List of closings that are grouped/divided by Agent Generated or Office Generated Category. You can change the date parameter by the Anniversary date, fiscal year, or any preferred dates.
Step 6: Samples of Rockstar Reports
1. Agent Billing Statements:
- Go to Reports tab > ALL> Agent Billing Statements.
- Choose the preferred date range
- Click Run
2. Agent CAP Report
- Go to Reports tab
- Click ALL to show all available reports
- Choose Agent CAP Report
- Click Run
3. Agent Gross Commission
- Go to Reports tab
- Click ALL to show all available reports
- Choose Agent Gross Commission
- Change Predefined Date to your preferred date (This Year, Last Year, This Month, ALL, etc.)
- Select Include/exclude rentals/referrals dropdowns
- Click Run
4. My Listings
- Go to Reports tab
- Click ALL to show all available reports
- Choose My Listings
- Change List Date to any preferred date
- Status default is “Active listing”. This can be changed to Pending or Processed/Closed if preferred
- Click Run
5. My Pendings
- Go to Reports tab
- Click ALL to show all available reports
- Choose My Pendings
- Select the preferred dates
- Click Run
6. Agent Net Commission
- Go to Reports tab
- Click ALL to show all available reports
- Select Agent Net Commission
- Select Preferred dates
- Click Run
7. Agent Performance Review
- Go to Reports tab
- Click ALL to show all available reports
- Choose Agent Performance Review
- Select Date Range
- Click Run (NOTE: This report has multiple pages. Click on the <> button to go to next or previous page)
8. Buyer & Seller List for Agents
- Go to Reports tab
- Click ALL to show all available reports
- Choose Buyer & Seller List for Agents
- Select the preferred dates
- Choose Side (ALL, List, Sell)
- Click Run
9. Commission Breakdown for Agents
- Go to Reports tab
- Click ALL to show all available reports
- Choose Commission Breakdown for Agents
- Select Preferred Dates
- Click Run
10. Agent/Office Generated Closings (filter by Any Date)
- Go to Reports tab
- Click ALL to show all available reports
- Choose Agent/Office Generated Closings (filter by Any Date)
- Select any predefined date (All, Last Year, This Year, etc.) or customize the date by anniversary date (for example: if Anniversary date is 01/01, filter from 01/01 thru 12/31 to run the closings for the current or previous anniversary year)
- Click Run
Step 7: Monthly Billing Statement Campaign and Invoice Payment Procedure
Access the support guide for monthly invoices by clicking here: Agent Billing and Invoice Payment Procedure.
.png)