.png)
Setting Up New Agent - Agent Onboarding
This guide shows how to setup a new agent in all of Century 21 Redwood Realty's systems
Please Note:
- If the Onboarding form shows a future start date, check with the EVP to confirm whether the license transfer application form has already been sent or if it will be sent closer to the start date. If it’s not done yet, hold off on proceeding unless access to certain systems (e.g., business cards, ZipForms, DocuSign) is needed in advance. Please notify Marni
- When onboarding an agent who was previously with CENTURY 21 Redwood Realty, do not create a new Darwin profile. Instead, reactivate the agent’s previous Darwin profile and access to Redwood Systems.
- If the agent will be in a team/ shared cap, check with EVP if the agent will need to have a separate account for their Redwood tools. Ex. Zipforms, DocuSign, Infinity cloud.
Step 1: Add Agent to Monday.com Projects
- Login to your Monday.com account.
- Once logged in, go to the “Onboarding” workspace and click on Agent Onboarding.
- Scroll down to the next available row and click on +Add Agent. Enter Agents name and fill out all the necessary fields.
- If the Agent’s LTM volume is $2,000,000 or higher, notify Marni in the pc-onboarding channel that the new agent is eligible for Dash submission.
- Click “Create Board.”
- Go to the Agent’s onboarding table.
- Select all tasks and assign to you under the “Responsible” column then Change the Start Date (Enter today’s date).
Step 2: Create Paperless Pipeline Agent Employment File and Add All the New Agent Paperwork to the File
- Log into Paperless.
- Click on “Add transaction.”
- Select the Location (office the agent is in. Put Ascend if they’re in the new agent program.
- Add the Transaction name: Agent Master File: Agent Name.
- Select the Status: “Agent Master File”
- Select Label: “Redwood Agent File”
- Delete the contents under More Info and Admin Info.
- Add Agent to the File (Once email and Paperless Pipeline account has been set up)
- Scroll to the bottom and click “Add Transaction.”
- Upload the agents paperwork (New Agent Packet, Google Form, Prior 12 Month Production and Power Form Data) to the file.
- Break apart each document
- Name each form what the title of the form is
- Categorize paperwork under “Public Docs”
- Pull the agents SSN from Docusign/ PandaDocs and add note Under the Agent info form (This information is redacted from the attachments in email)
- Reach out to Marni for login credentials if the paperwork was done in PandaDocs to find the Agent’s SSN.
- For Agents who signed through DocuSign, you will need to log into the Admin Docusign account.
- Click on the user profile (upper right)
- Switch Account
- Ecosystem- Recruiting Workspace – 1531358317
- Manage
- Sent
- Find Agent
- Use the Dropdown Arrow next to the Download button
- Form Data
- You will find the SSN listed here. Print this form to a PDF and upload in the agent’s Paperless Pipeline file.
Note: If the DocuSign envelope does not appear in the Sent folder, follow these steps:


12. Confirm if there is an addendum and special clause for marketing then send to Marketing Team.
Step 3: Create a folder for the Agent’s onboarding files
- On the Field Ops Shared Drive, create a new folder for the Agent within their assigned Office directory.

-
Create a copy of the Onboarding Tracker spreadsheet and move it into the new Agent’s folder.
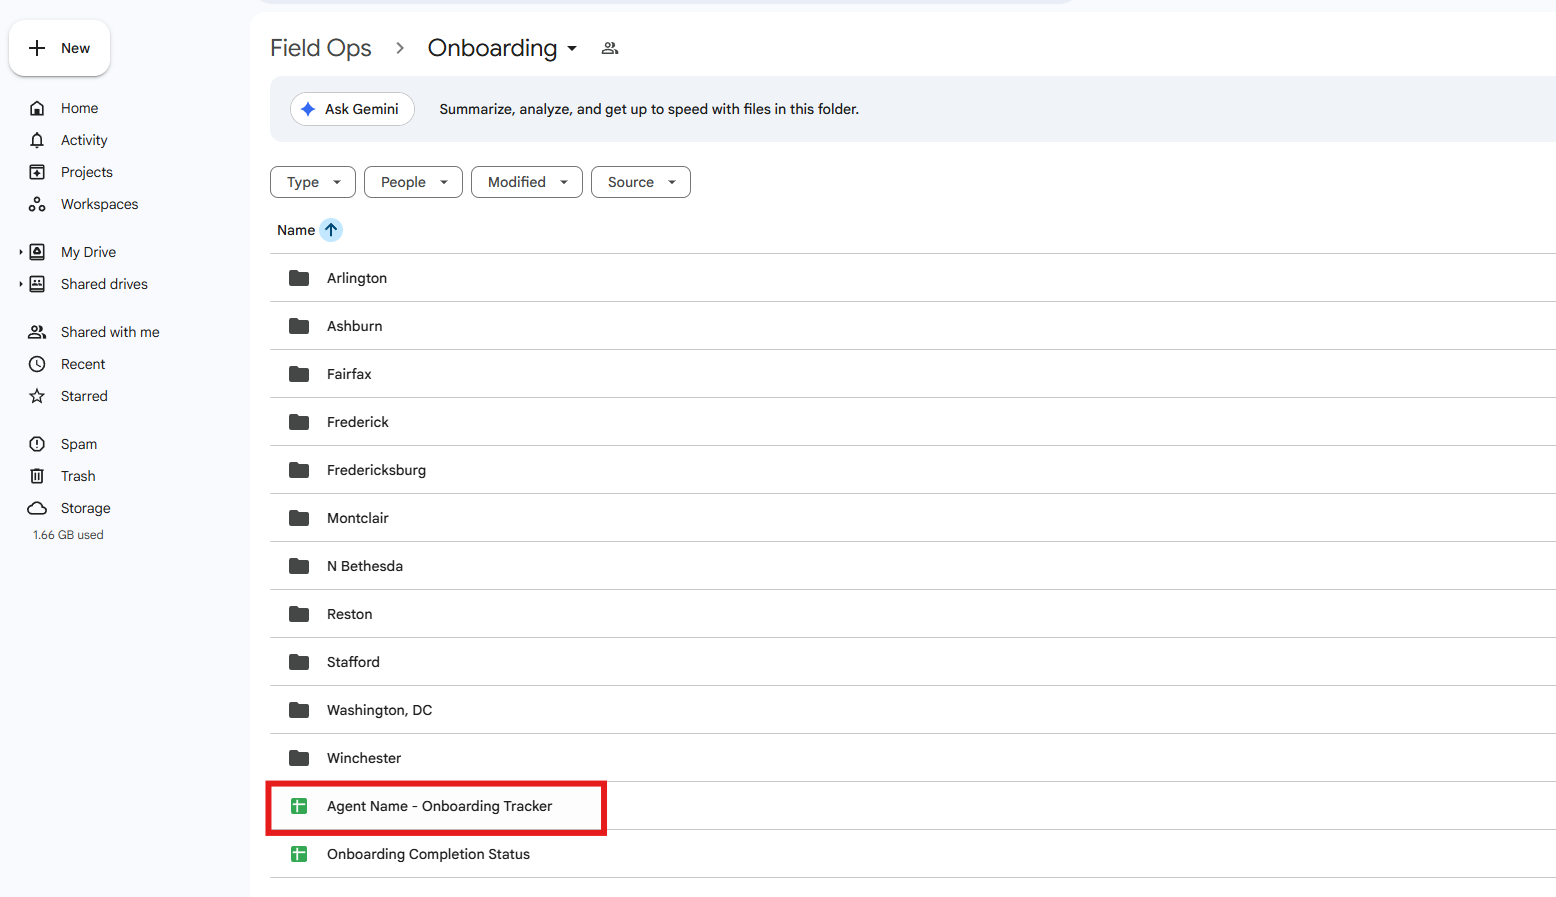
- Request assistance with creating the bio, email signature, and social media graphic

Step 4: Create an email for the agent
- Log into your Work Gmail account
- Click on the Google Apps Icon (top right hand side of the screen)
- Click Admin
- Click User
- Add New User
- Organization User = Agent
- Password = Last name, last 4 digits of phone number then exclamation point. (i.e., Miller7248!)
- Add email to Office and License Distro List. If the Agent is part of Ascend, add them to the Ascend Distro.
- Assign Google Workspace license
- Select Google Workspace Frontline Starter (Reseller pricing) – default
- When adding a license from the User’s list, follow the steps below:
- Search for the agent then click on Assign licenses.
- Click the dropdown, Select Google Workspace Frontline Starter (Reseller pricing)

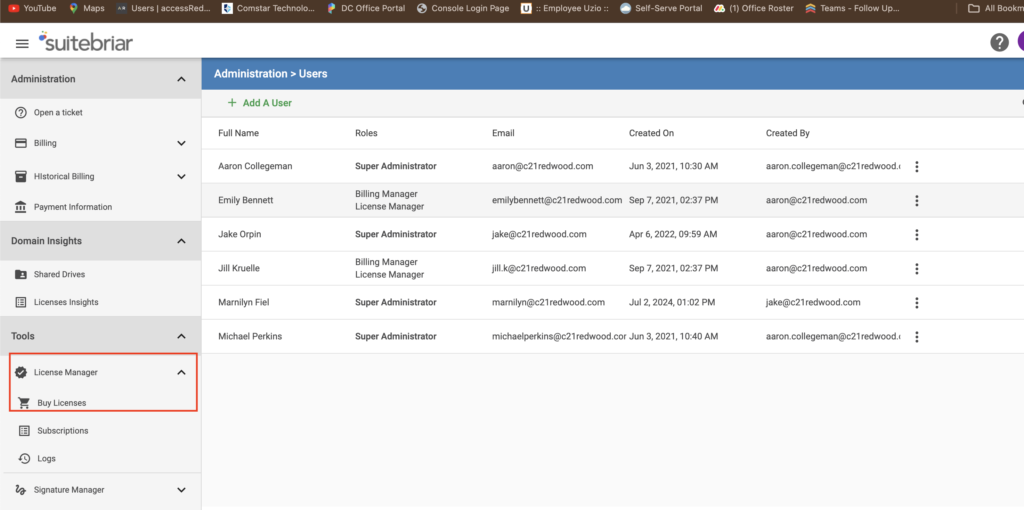
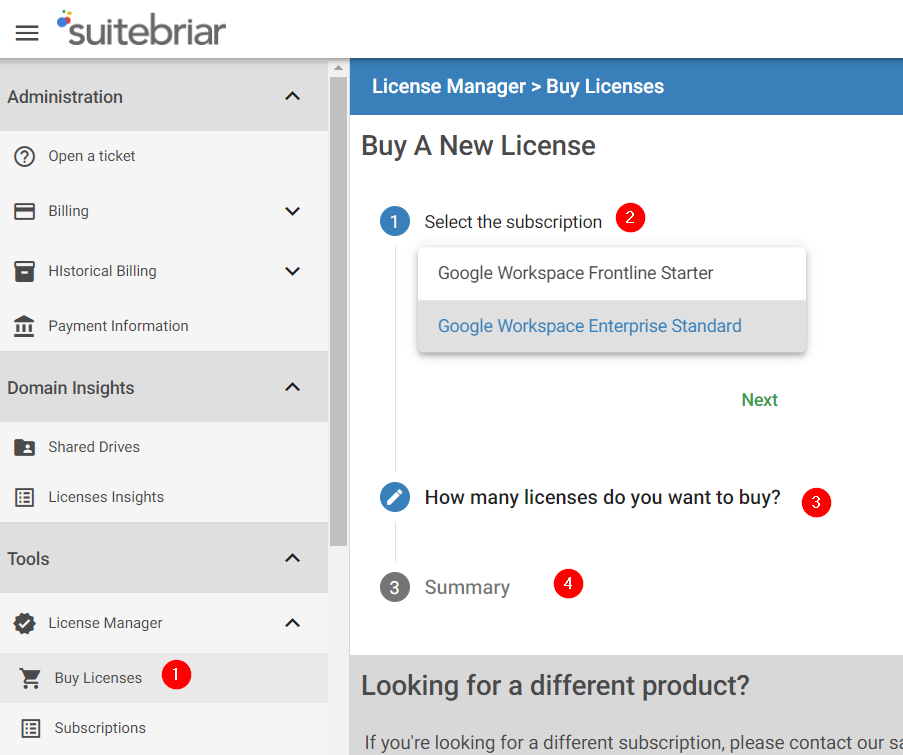
Note: If there are no more Google licenses available, reach out to Jake/ Marni to get additional seats.
Go to https://tools.suitebriar.com/c/c21redwood.com/admin/users to add new licenses.
Step 5: Add Agent to Darwin
Please Note: When onboarding an agent that was previously with Century 21 Redwood Realty, do not create a new Darwin Profile for agent. You will need to reactivate the terminated profile.
1. Once in Darwin click on the People tab then “+ New” and fill out the following:
- First and last name
- Person Type: Agent
- Office the agent will be in.
- Email address
- Home Address
- Mobile Number
- Then click Add
- After you click “add,” add the mailing address and birthday then click SAVE.
2. Click on the “People Links” tab on the left-hand side of Darwin.
- Add the agents SSN under tax ID.
- Under 1099 type, click on the dropdown and choose “Non-Employee.”
- If the agents has an MLS ID, confirm that is already under CENTURY21 Redwood in Bright then add it to the MLS ID section.
- Click Save.
3. Click on the “Agent basics” tab on the left-hand side of Darwin.
- Add the start date which you can find from the Agent Info Form.
- If the agent is an Ascend agent, start date and anniversary date should match. If they aren’t in Ascend, you can find the anniversary date on the Commission Rider.
- Add the same date as the start date to the career date and brand date.
- Then go into “positions” and add the start date there and click on the box for “Full time” and save.
- Check box “is on-boarding finished”
- Click save then submit.

4. Click on Custom Fields
- Copy and Paste the Agent Employment Paperless Pipeline File URL Link in the Custom Field box (remove the https:// or it will cause an error)

5. Create a Darwin Cloud account for the agent.
- Click on the “Security” tab at the top of Darwin.
- Click “New” and add the agents username which is lasnamefirstinitial (example: OrpinJ).
- Add the agents email address.
- Add Standard password (reference password on the Onboarding Accounts Spreadsheet)
- Click “Start.”
- Under “Roles,” select the box for “Agent.”
- At the top it says “agent,” type in the new agents name till you see it on the dropdown.
- Under “offices,” add the office the agent will be attached to. If they are in Ascend, add both home office and Ascend.
- Click Save.
Step 6: Create a Zipforms account
- Once in Zipforms click on the tab at the top named “admin” then “Users.”
- Click on + new top left hand portion of the admin page.
- Fill out the following:
- First Name
- Last name
- Username (Redwood email)
- Email address (Redwood email)
- Click Next.
- Choose the office the agent will be in.
- Click Next.
- Choose C21RE and BRHT Libraries for every new agent.
- Choose the correct libraries depending on which state the agent is licensed in (for VA always use NVAR)
- Click Next.
- Choose TMS.
- Click Next.
- Change Time Zone to Eastern Time Zone.
- Click Save.
Note:
- When requesting for additional library seats in Zipforms, please provide NRDS # as some associates are requiring it before providing access for the agents
- Once account is set created, an email will be sent to the agents Redwood email to set up their account
Step 7: Create a Docusign Account for Agent
- Log into Docusign using the username: Docusignadmin@c21redwood.com.
- Once logged in, click on “Settings.”
- Then click on “Users” from the left hand portion of the screen.
- Add User and fill out the Redwood email address.
- Click Next.
- Add the Agent’s Full name.
- Add the Job Title: Realtor.
- Add the Company: Century 21 Redwood.
- Click NEXT.
- Click NEXT (this portion is left blank).
- Set the Permission Profile: DS Sender.
- Click Add User.
*An email will be sent to the agents Redwood email to setup their account
NOTE: Do not activate a DocuSign account yet for an unlicensed agent. Please notify the ASM/EVP. (See HS #592746)
Step 8: Create a Paperless Account for User
- Login to Paperless Pipeline
- Once logged in click on your name in the top right hand portion of the screen then admin/settings
- Then “Manage Users” left-hand portion of the screen
- Add User
- Fill out the following
- First name
- Last name
- Email address (Redwood email)
- Phone number (On agent info form)
- Primary Location (Put ascend is agent is in the new agent program)
- Role: Realtor
- Password: lastnamelast4ofphonenumber! (Example: Orpin1246!)
- Under User Permission, go to the Office they’re in and check off “Upload Docs and Assign Docs to Transaction.”
- Add User.
- Go Back to the Agent’s Master File and Add Agent to File
Step 9: Create user in Moo.com
- Go to Moo.com.
- Sign-in.
- Find the Dashboard and click on the “People” tab on the left hand portion of the screen.
- Click on add more people then Invite a person.
- Add the following information for the user:
- First name
- Last name
- Email (Redwood email)
- Then click on “Employee” at the bottom of the screen.
- Send Invite in the bottom right.
*An email will be sent to the agents Redwood email
Resources:
Step 10: Add Agent to Infinity Cloud
- Login to InfinityCloud Admin Console.
- Go to User Management>Users.
- Click Add User and Create New User.
- Enter agent’s email address. Hit Next.
- Add Role – Only use End User role. Click Add.
- Select Yes on the dialog box and hit Next then Click on Create.
Step 11: Add agent to Papercut (Jake will handle this)
*Reach out to support@c21redwood.com when a new agent needs to be added. They will add the agent to Papercut since you have to be on R21 network to access Papercut. Provide the name of the agent, email and last 4 of phone number.
- Log into http://192.168.0.5:9191/app?service=page/Home
- Login: orpin _ jake (ask Marni/Jake for the password)
- Once logged in, click on the “Users” tab.
- Then Create internal user which you can find on the top right hand portion of the screen in a dropdown. It might say “Action,” if that’s the case, you just need to click the three … and you will see “Create Internal User.”
- Add the following:
- Username (Always lastname_firstname) in all lowercase
- Full Name
- Email Address (Redwood email)
- Password: Last 4 of phone number
- Verify Password
- Identity Number: last for of phone number
- Register
Step 12: Confirm that the agent is active in RealSatisfied.
- In your browser, enter the default URL format: https://rss.realsatisfied.com/rss/agent/agent-name
- The URL usually works 24 hours after the agent has been added in Darwin.
- See example: https://rss.realsatisfied.com/rss/agent/rebecca-stone
- Confirm that the RealSatisfied office is already listed as Century 21 Redwood Realty

- If it doesn’t work yet a screen will appear that will tell you this URL doesn’t work.
- Go to 21online.com and serach for RealStatisfied/ QSS
- Search the agent’s home office
- Click the appropriate office
- Go to “Admin” tab, then “Team Members” and Search for the agent
- Click on the Agent's profile and confirm the URL link.


Step 13: Add Agent in Luxury Presence
-
Login to Luxury Presence. Go to Content tab, select “Agents” and click Add New.
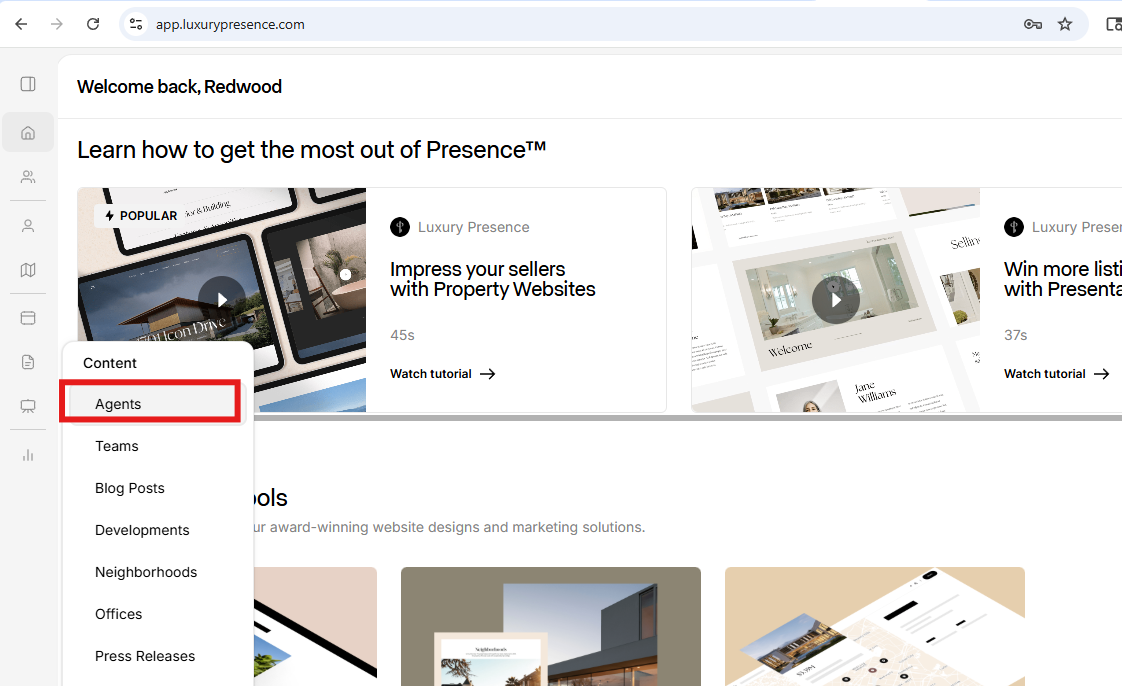
- Enter the following Agent details then Click Save.
- First Name & Last Name
- Email Address
- MLS Agent ID
- Position Title: Real Estate Agent
- Enter Agent Bio
- Add Agent Contact Information
- Social Media URLs
- Upload Agent Photo
- Enter “agent” on the “Tags” field.

Step 14: Send Info to Luxury Presence Support to link Agent MLS Listings
- Email to Luxury Presence Support – support@luxurypresence.com. (See HS #561377)
- Send the following Agent Info:
- Agent Name
- Agent details page link
- MLS ID
Step 15: Add agent and agent’s information to SNAP
- Login to SNAP
- From the side toolbar, click “Agents.”

- Click “Add Agent” and enter the Agent information.

- Create Agent Account and Password = Last name, last 4 digits of phone number then exclamation point. (i.e., Miller7248!)

-
Enter the Agent’s requested subdomain. If none is provided, use the default format:
FirstnameLastname(i.e., JonhMiller).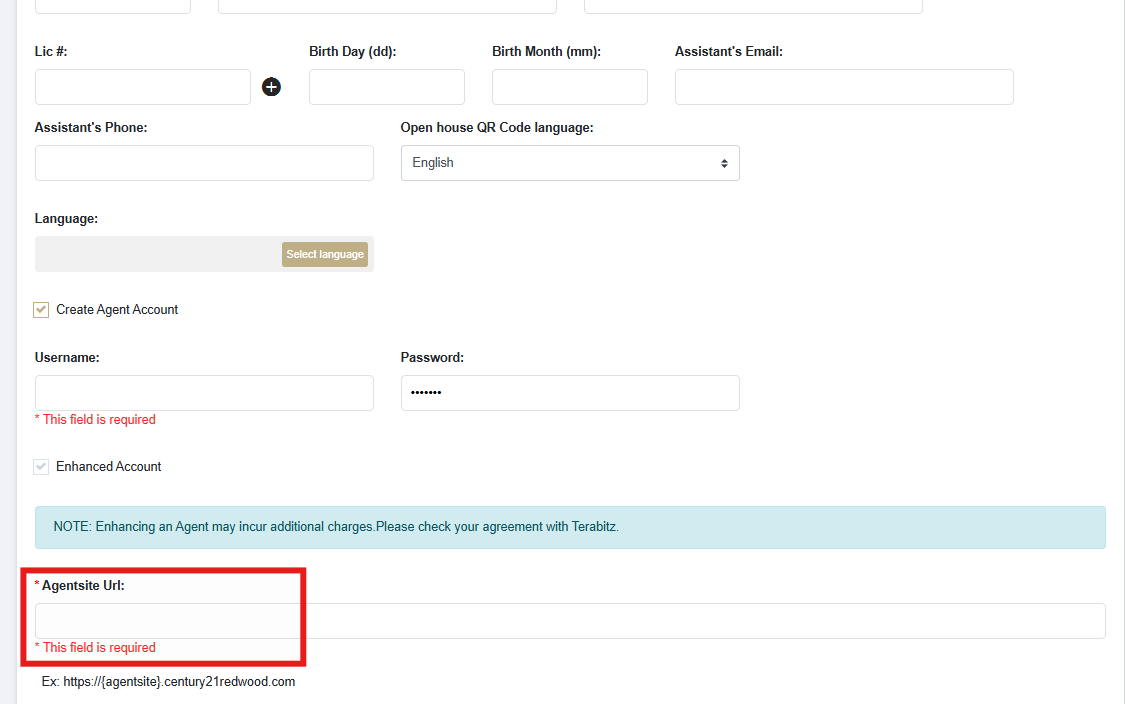

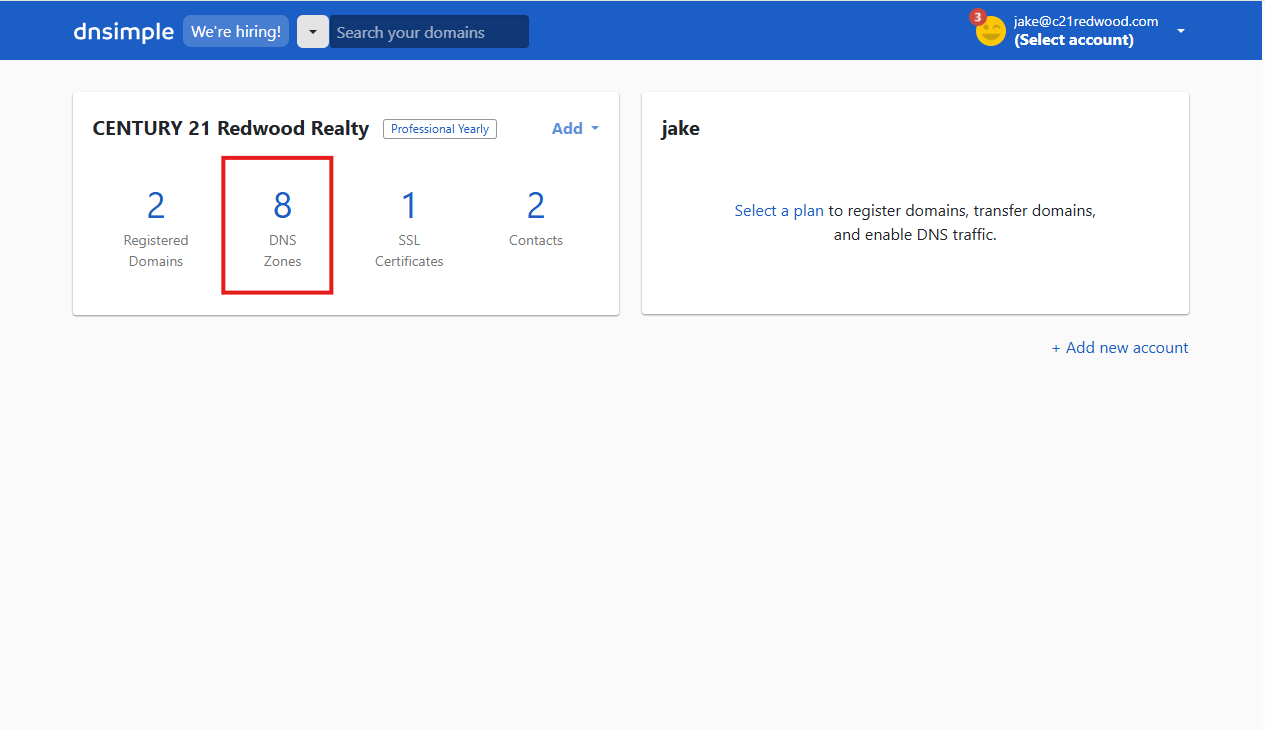
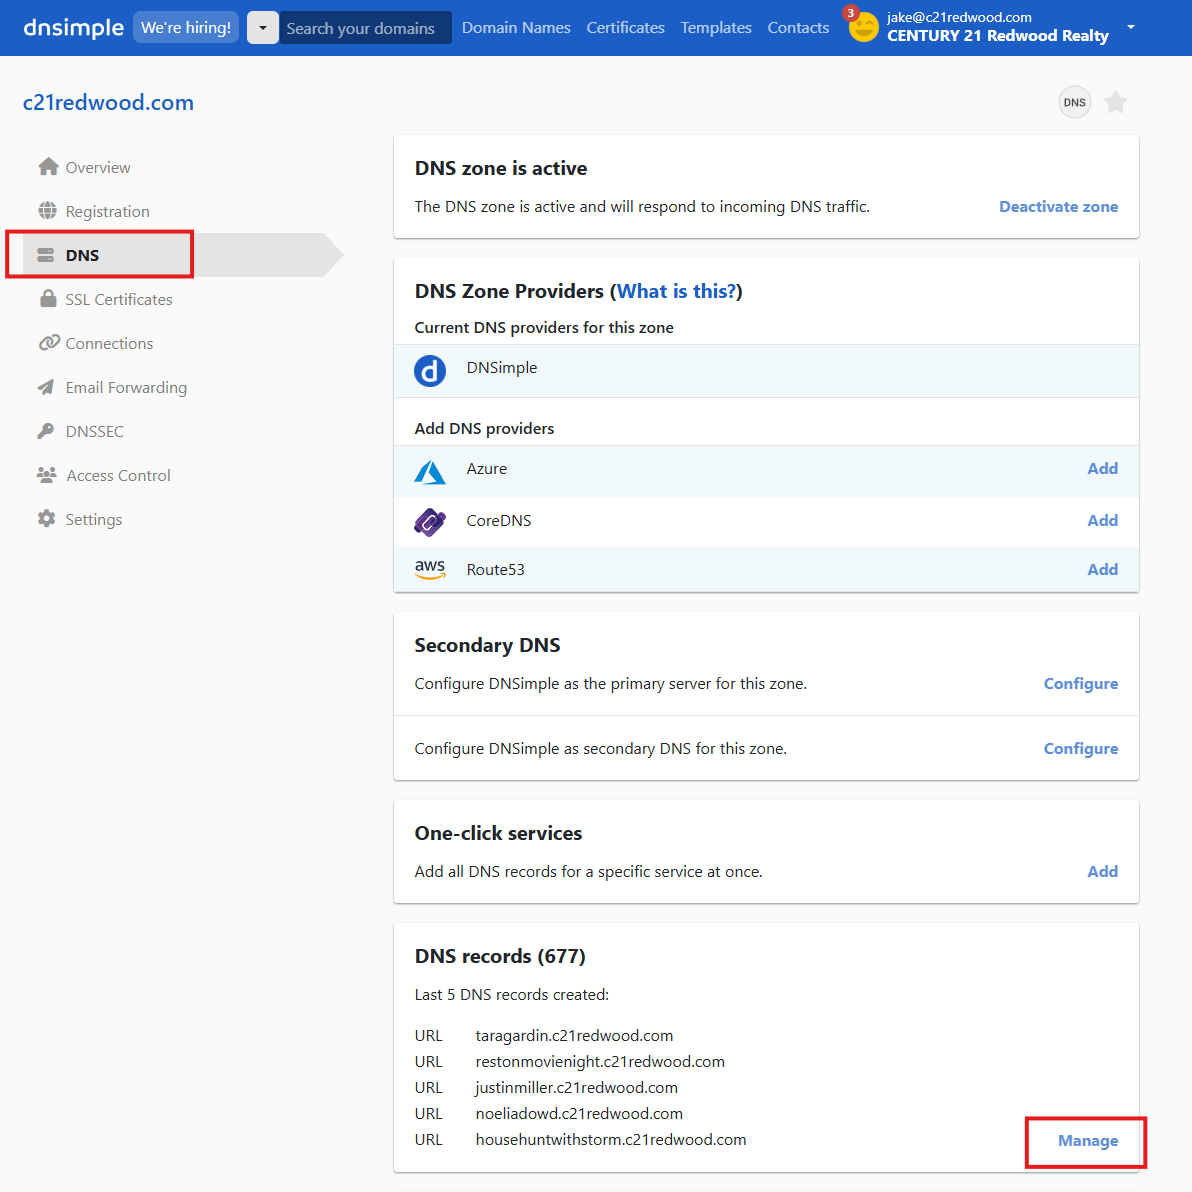
Step 16: Add Agent's Subdomain in DNSimple
- Login to DNSimple. Click the DNS Zones then select the c21redwood.com domain.
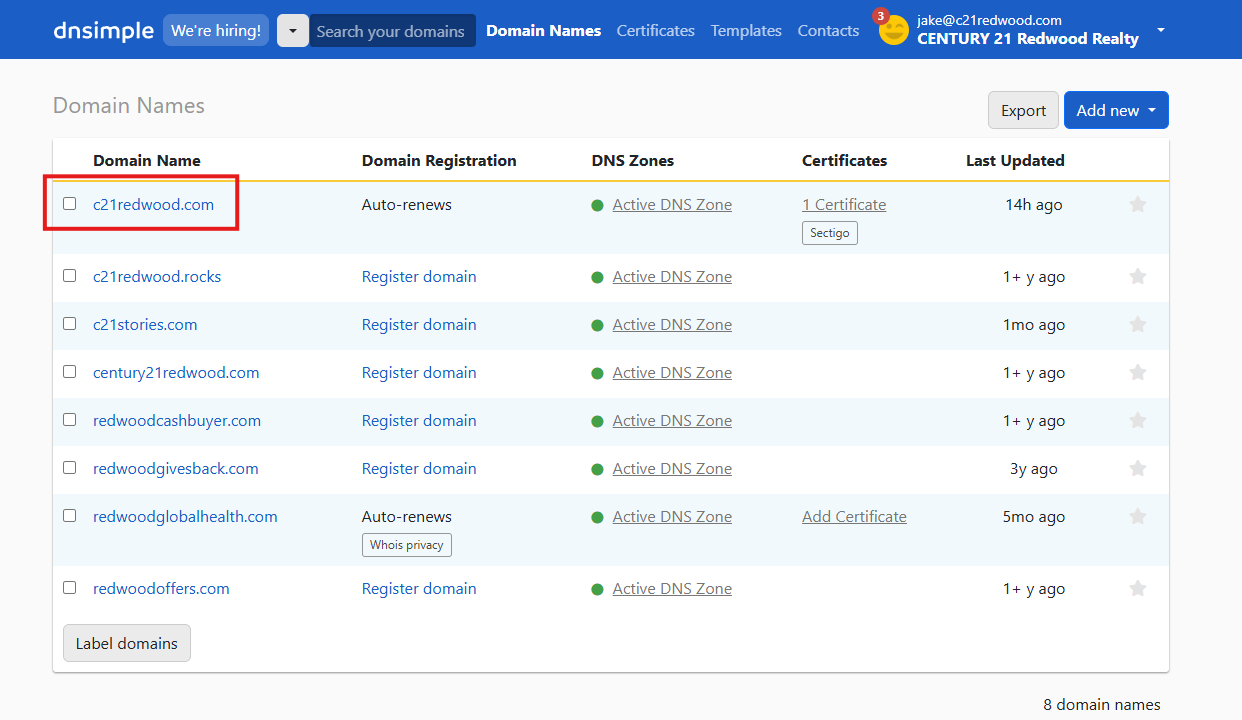
- On the left menu, select DNS then scroll down to DNS Records and click Manage.
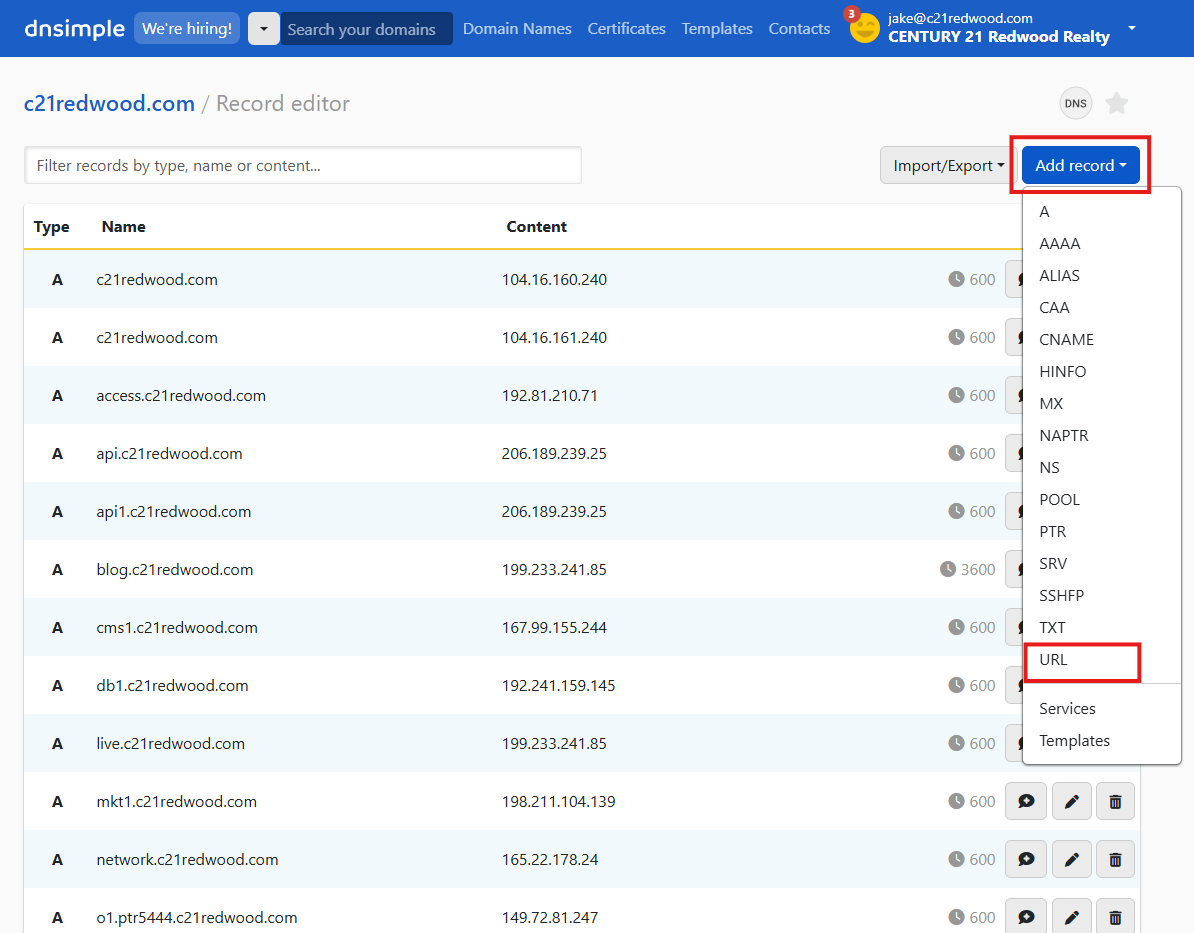
- Click on Add Record then URL:
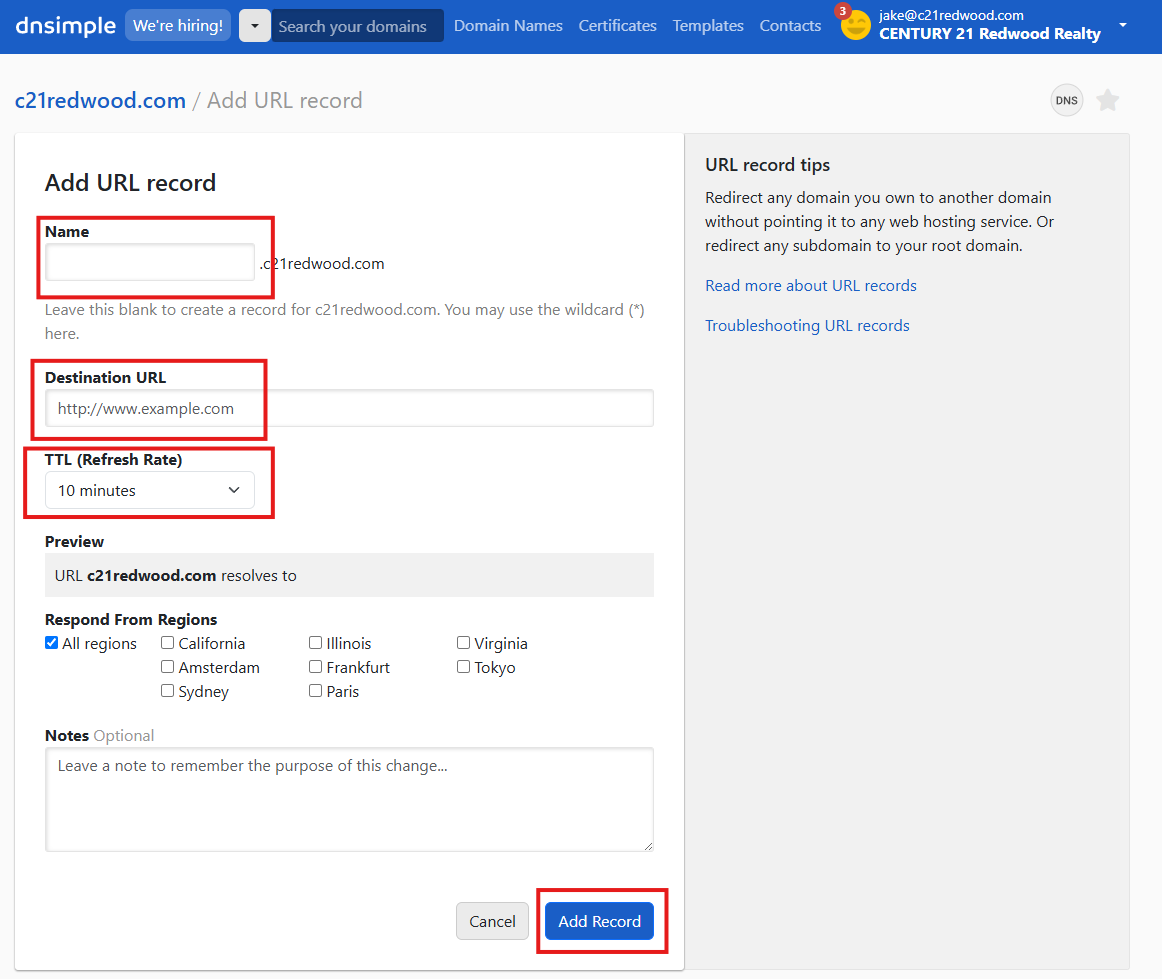
- Fill in the following fields then Add Record:
- Name: Agent’s preferred subdomain based from the Agent Info Form.
- Destination URL: Enter the SNAP website URL
- TTL (Refresh Rate): Set to 10 minutes.
-
Add the agent’s subdomain in Darwin.


Step 16: Add Agent in AccessRedwood by StackWrap
- Follow the steps outlined in the support guide Adding Agents in StackWrap
Step 17: Add Agent to Active Agent Roster
- Go to Active Agent Roster in Monday.com.
- Add a new item by entering the Agent’s name and fill out the following columns:
- Office, Status, Team (if applicable), Corporate/ Legal Name (if applicable)
- Commission Split, Company $, Email, Website, Start Date, Birthday, CAP Anniv Date
- Phone Number, Recruiter, Coach, Agent Recruiter, Darwin Cloud Username
- Transaction Fee, Who Pays Transaction Fee, PP File Link, Marketing Credit, MLS ID
- Agent Darwin ID, Dash Person ID, DTA Email Address


Step 18: Add Agent to Ascend Roster (for Ascend Agents Only)
- Go to Ascend Roster in Monday.com.
- Add a new item by entering the Agent’s name and fill out the following columns:
- Local Office
- Agent Status
- Start Date (Based on Ascend Enrollment Date indicated on the Commission Rider.)
Step 19: Send Field Staff New Agent Credentials
After the employment file is created, documents are broken apart and Primary Redwood accounts have been created, we need to send the ASM’s the agent login information.
- Click on Note/Email
- Go to “Message Templates” on the right side and scroll to the bottom till you see “Welcome Email for agents new to Redwood”
- Fill out the following information on the template
- Missing Paperwork (Email the ASM/ EVP for the Local Real Estate Association Activation/Transfer Paperwork)
- Printer Username: lastname_firstname (created this in Papercut)
- Print Code (created this in Papercut, typically last 4 of the agents phone number)
- Password: Lastnamelast4phonenumber! (This should be the password for email and PaperlessPipeline
- Email address we created for the agent
- Once filled out, send the information to the office ASM and EVP .
- If the agent is in Ascend, copy Melanie Thompson
- Check the google form to see if agent will be part of Relo Team – If yes, email Tina From Relocation to confirm the systems have been set up for the agent. (If the agent is not in Relo, no further steps need to be taken.)
Step 20: Update Onboarding Spreadsheets
- Open the Onboarding/ Offboarding Tracker and update all relevant fields for the new agent.
- Navigate to New Hires for Company Wide Meetings and input the required agent details.
- Please make sure to enter the agent in the appropriate tab corresponding to their hire month.
- Go to Onboarding/ Ascend Graduation Gift and enter the agent’s information.
- Note: The onboarding gift is only applicable to agents with prior production.
- Go to Notable and enter the agent’s information
- Go to Intranet and enter the agent’s information
Step 21: Add agent and agent’s information to Select Group Intranet
- Login to Select Group Intranet
- Click Add and enter the required Agent information.

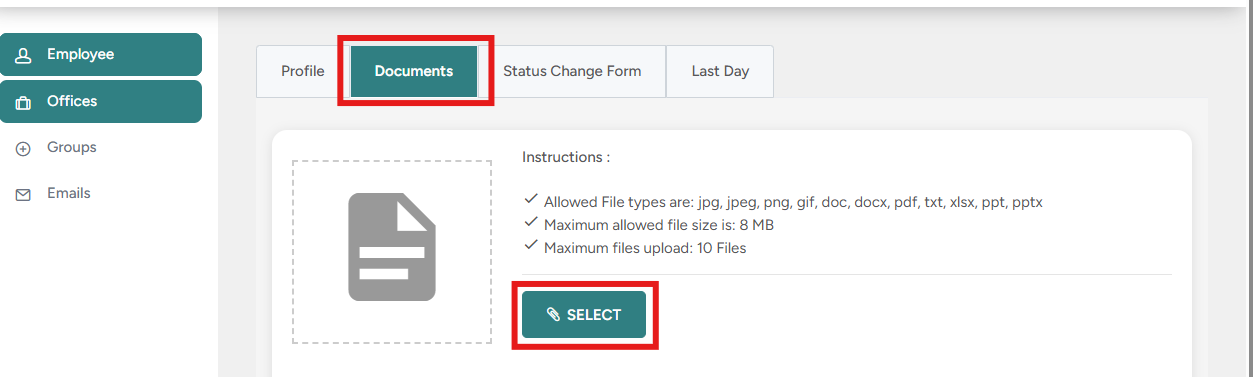
- Download the documents from the Agent’s master file in Paperless.

-
Click “Documents”, then click "Select" and upload the documents downloaded from Paperless.
- Email ANgai@selectgroupre.com Agent name and email (See HS #718851)

Step 22: Setup Agent's Commission Profile (Commissions)
- Go to the agent’s employment file in Paperless, open the “New Agent Paperwork – initial submission” document and pull-up the agent’s profile in Darwin.
- Confirm that all personal information entered in People Basics & People Links screen matches the data from the agent’s paperwork.
- Go to the Agent Basics tab and confirm the following information (enter if blank):
- Start Date, Anniversary Date, Career Start & Brand Start Date
- Recruited by, Coached by and Agent Team (if applicable)
- Go to Commissions tab and enter the following information based from the Commission Rider:
- Select Agent’s Plan (CAP, Ascend, Fixed, Sliding CAP 70/30, Sliding CAP above 70/30)
- Enter Franchise Fee pct (6%).
- Enter Company $ pct and Cap amount.
- Enter Commission notes. See Entering Commission Plans in Darwin. (Edit the template if applicable)
- Enter the Agent’s Prior AGCI, Prior Volume and Prior Sides.
- If the agent’s GCI LTM is at least $100,000, they are eligible for the Mass Mutual Whole Life Policy.
- Send an email to ASM/EVP that we will be sending the agent’s information to Revolution Wealth. (See HS #497672 - change to Revolution Wealth)
- Send the Agent’s information to Revolution Wealth. (See HS #497683)
- Brad Wilks bradley@revolutionwealth.com
- Andrew Evans andrew@revolutionwealth.com
- Enter Applicable overrides in Darwin. See Commission Plans & Overrides.
- Go to Custom Fields and enter the following information:
- Transaction Fee, Who Pays Transaction Fee (default is Agent if there are no transactions yet)
- Threshold High and Low (if applicable)
- Confirm the agent’s preferred paycheck format based from the agent info form. If they selected ACH, send an email to the agent a week after the initial onboarding to request for their ACH Account information. If the agent selected pay by check, put a note on the agent’s commission profile and add the agent to the Pay by Check row on this spreadsheet.
- For Returnees, go to Billing tab and confirm if agent has a balance or bad debt write-off by Accounting.
- If the agent has an outstanding balance upon exit, please add a note in Commissions tab.
- Bad debt expense – balance written off. Agent had an outstanding balance of ____upon exit. Please confirm the amount due with Accounting and deduct it from any future closings.
- If the agent has an outstanding balance upon exit, please add a note in Commissions tab.
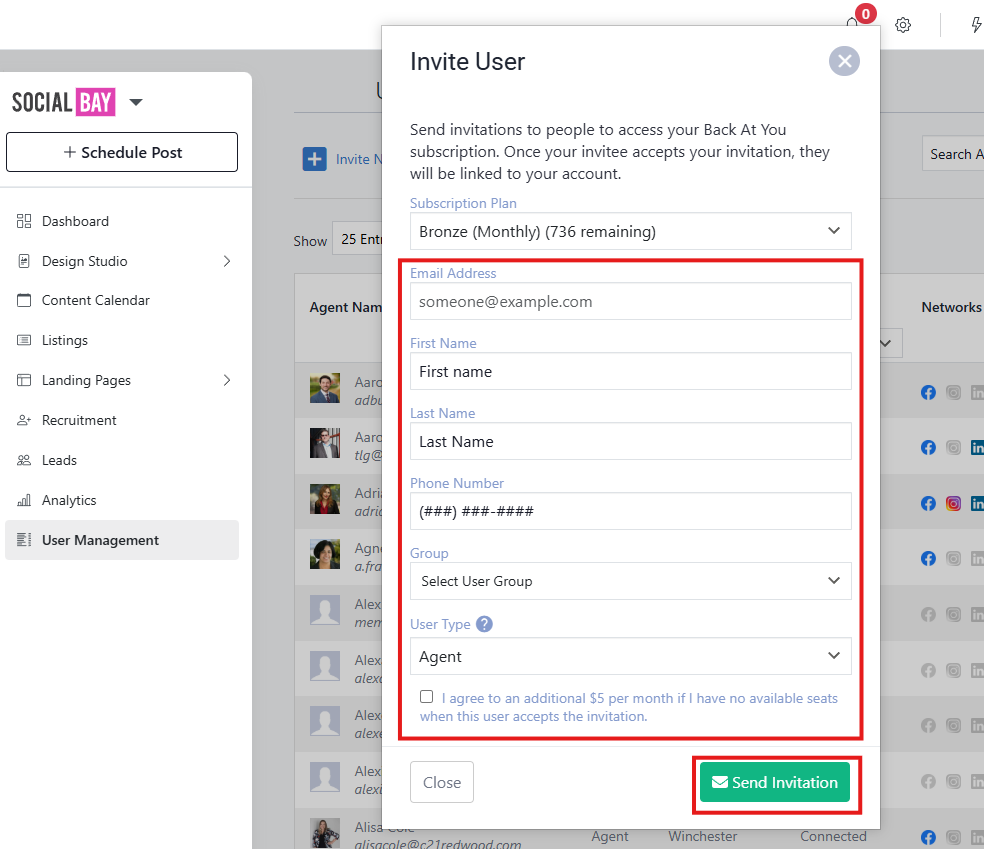
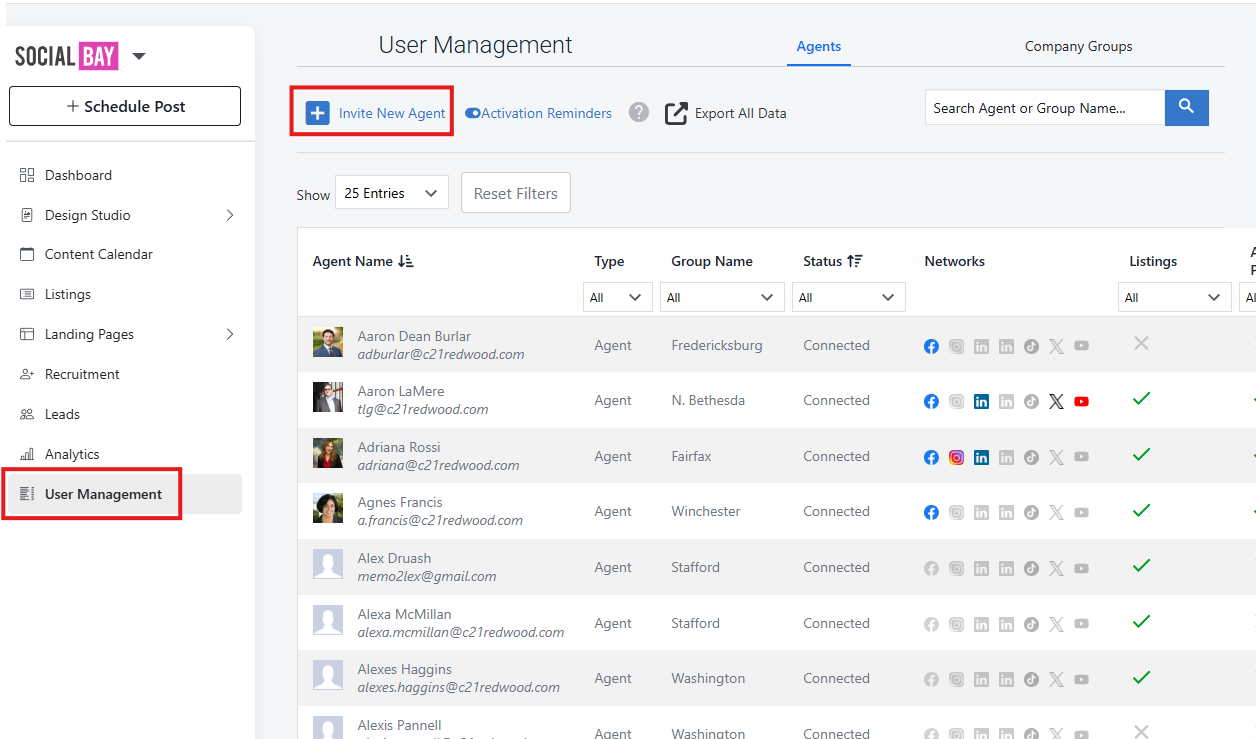
Upon Request: Adding an Agent in Social Bay
- Go to https://smc.backatyou.com/site/login
- Navigate to the User Management section.
- Click on Invite New Agent and fill out the required fields and click Send Invitation
-
-