Creating a New Active Transaction in Paperless (corporate use only)
This step-by-step guides walks you through how to create a new transaction file in Paperless Pipeline for buyer agreements and active listings.
The corporate processors are responsible for processing incoming documents in Redwood’s Transaction Management system, Paperless Pipeline. Majority of the documents in the que obtain new listing agreements and buyer agreements that need to be set up in the system. Follow the steps below to complete the tasks for processing active broker agreements:
Step 1: Search the property address and/or client names in the [Search Transaction] bar
When searching for a transaction in Paperless search by the property address (Listing Agreements) or search by client(s)/purchaser name(s) (Buyer Agreement). If a transaction comes up and it is the correct address and client’s (still active) you can assign to that pre-made transaction. If nothing shows up, create a new transaction.
- If a transaction comes up and it is the correct purchaser/buyer name (still active) you can assign to that per-made transaction.
- If addresses/buyer agreement files come up and are not correct/expired/closed, check the file and paperwork, if the file is for a different purchase/cancelled/expired, create a new transaction.
Step 2: Click [Add Transaction]

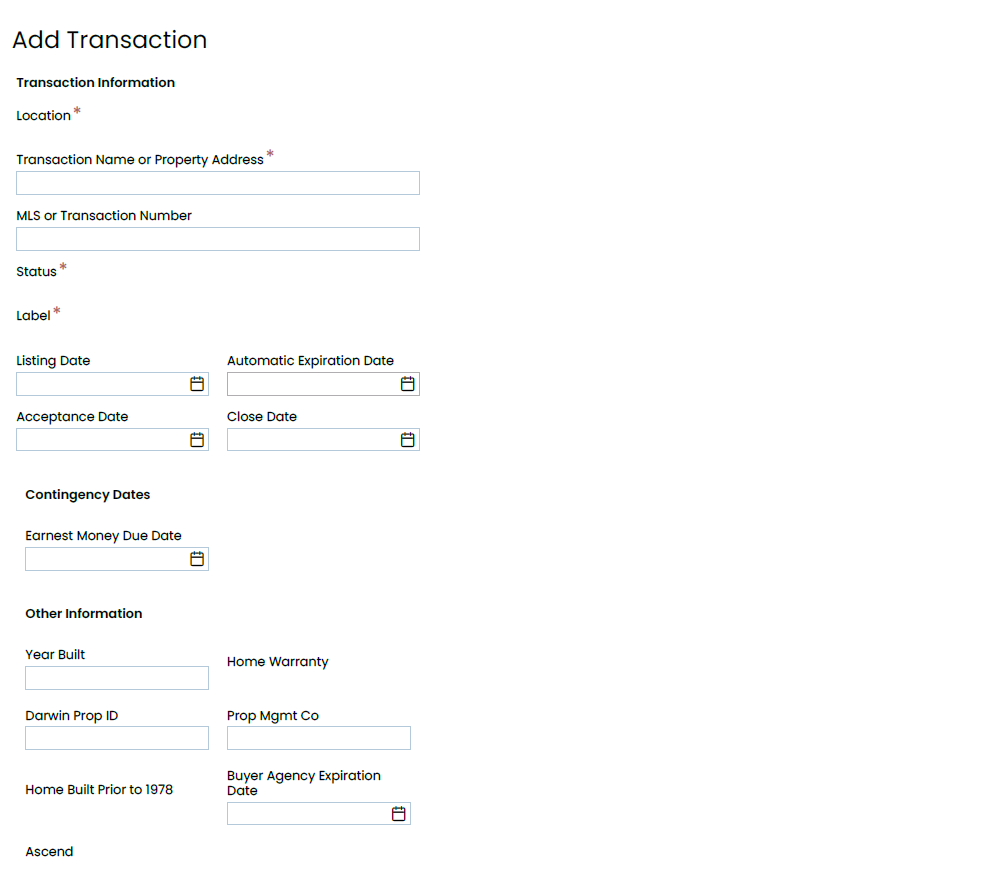
Step 3: Enter the Critical Data Fields
When creating a new transaction in Paperless you need: Location (what office agent works in), transaction name (property address/ buyer(s) name(s), status (state, purchase buyer agreement/ State, active listing agreement), client name(s), assign agent to transaction. You can always update existing information and/ or add additional information throughout transaction. Some fields will be left blank depending on the status of the transaction.


CRITICAL DATA FIELDS:
- Location: Select the office location in which the agent is under.
- Transaction Name / Property Address: It’s a good policy to always use the property address (listing agreement) or the clients names (purchase agreement file) as the transaction name.
- Status: Select the stage that best describes the current status of the transaction
- Label: A transaction label is used to categorize a transaction (for example, Residential, Land, New Construction, Commercial, etc.) You can filter and search transactions based on their label.
- Close Date: Enter the expected closing date for transaction in the format m/d/yyyy
- Listing Date: Enter the date the property is active on the market.
- Expiration Date:The transaction status will automatically change transactions to an “Expired/Withdrawn” status if the listing is still in active status after their expiration date has passed. Automatic expiration date is 90 days.
- Acceptance Date: Enter the ratification date in the format m/d/yyyy (only when a contract is received)
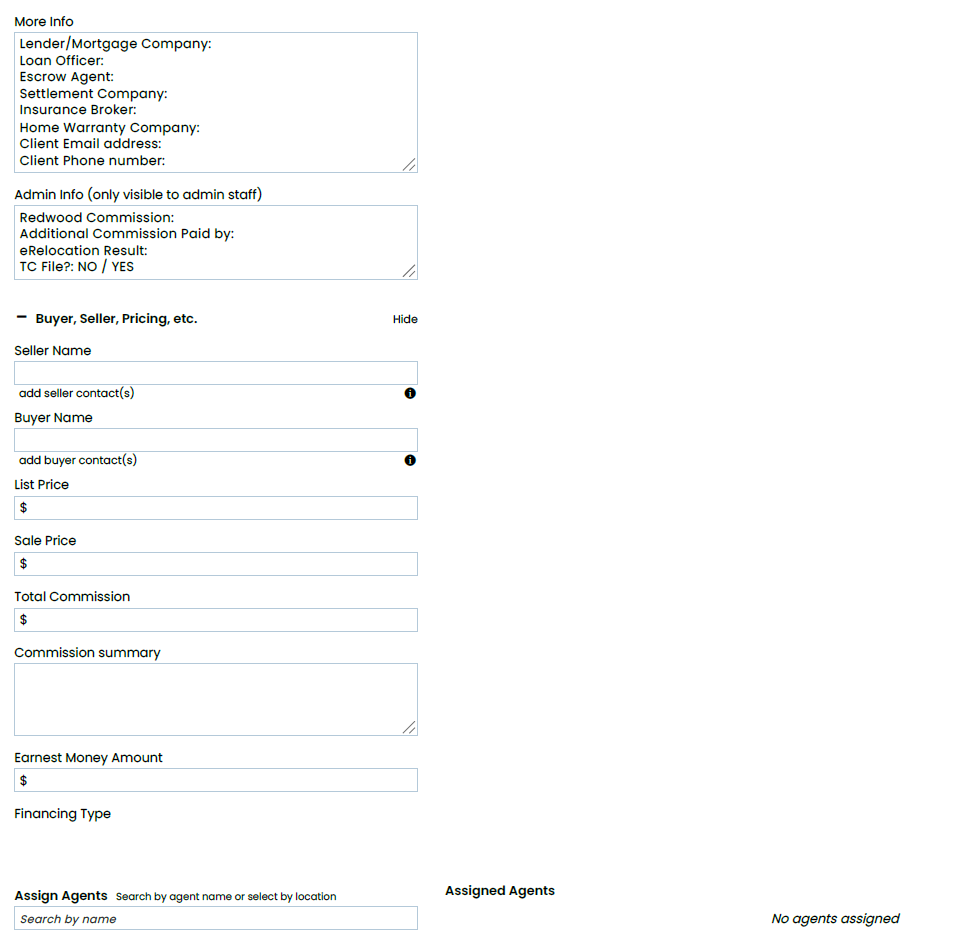
- More Info: Enter information about this transaction not covered by other fields. For example, lender, finance type, notes, special requests, etc.
- Buyer Name: Enter the name(s) of clients purchasing the home
- Seller Name: Enter the name(s) of clients selling the home
- List Price: Enter the current list price of the home.
- Total Commission: Leave this field blank. Utilize the Admin Info section to add total commission.
- Commission Summary: Leave this field blank. Utilize the Admin Info section to add commission summary, if necessary.
- Admin Info: Add notes in this section that is only visible for internal staff.
- Assign Agent: Assign all Redwood agents involved in the transaction to give them access and fully visibility to the file and documents.
- Outside (Co-op) Agents: When agents outside your company are involved in a transaction, you can add their information toward the bottom of the Edit Transaction page. This information is for reference only; these agents won’t have access to the transaction.
Step 4: Click [Add Transaction]
To save the new transaction file, click [Add Transaction]
Step 5: Helpful Tips for Buyer Agreements
Once Assigned to file:
- Make sure the document label is correct and categorized under buyer docs
- Make sure buyer(s) initials are on all pages and make sure signatures(s) is on the last page
- make sure there is an expiration date (page 1)
- Break apart documents if there are more documents than just the Buyer Agreement (i.e., Affiliated Business Arrangement, coversheet – all or some could be included)
- Rename documents that you are breaking apart – most doc names are pre-generated, just name it the best you can
- Check off reviewed and entered
- A checklist will generate on the left of Paperless for VA and DC transactions (You must add the correct checklist(s) are Maryland transactions)
- Check of the Affiliated Business Arrangement Disclosure (if we have it and the client(s) have signed)
- Check of Buyer Agreement if all client have signed/initiated
- Add a due date on the “Buyer Broker Expiration Date” task on the checklist calendar
Sending to DocuSign
- Send Buyer Agreement to DocuSign from the transaction file
- You add the corresponding broker of the office to be the signer, cc agent(s) on the transaction and the transaction email address
- Place broker initial on every initial section and place date signed and signature field on the last page
- if there are initials of the client(s) anywhere else on the agreement, place a broker initial field next to it (i.e., the cross with initials)
- Preview documents to make sure the broker’s initials are on all pages
- Make note on the attachment in the transaction file that it was sent to DocuSign for broker signature
Do NOT Send to Docusign if:
(please notify processing with a comment on the document that has missing/incorrect information)
- Missing expiration Date
- Missing Buyer(s) initials/ signature
- Missing Brokerage/Agent info on first and last page of agreement
- Missing one of the pages (i.e., you have pages 1, 2, 4 – missing page 3)
Step 6: Helpful Tips for Listing Agreements
Once Assigned to file:
- Make sure the document label is correct and categorized under listing docs
- Make sure seller(s) initials are on all pages and make sure signatures(s) is on the last page
- Make sure there is an expiration date (page 1)
- Break apart documents if there are more documents than just the Listing Agreement (i.e., Affiliated Business Arrangement, Residential Property Disclosure, Consent for Dual Agency, coversheet – all or some could be included)
- Rename documents that you are breaking apart – most doc names are pre-generated, just name it the best you can
- Check off reviewed and entered
- A checklist will generate on the left of Paperless for VA and DC transactions (You must add the correct checklist(s) are Maryland transactions)
- Check of the Affiliated Business Arrangement Disclosure (if we have it and the client(s) have signed)
- Check of Listing Agreement if all client have signed/initiated
Sending to DocuSign
- Send Listing Agreement to DocuSign from the transaction file
- You add the corresponding broker of the office to be the signer, cc agent(s) on the transaction and the transaction email address
- Place broker initial on every initial section and place date signed and signature field on the last page
- if there are initials of the client(s) anywhere else on the agreement, place a broker initial field next to it (i.e., the cross with initials)
- Preview documents to make sure the broker’s initials are on all pages
- Make note on the attachment in the transaction file that it was sent to DocuSign for broker signature
Do NOT Send to Docusign if:
(please notify processing with a comment on the document that has missing/incorrect information)
- Missing expiration Date
- Missing Seller(s) initials/ signature
- Missing Brokerage/Agent info on first and last page of agreement
- Missing List price
- Missing Compensation
- Missing one of the pages (i.e., you have pages 1, 2, 4, 5 – missing page 3)
.png)