.png)
How to add/edit Agent profile in darwin
On-boarding agent checklist for adding agent information in Darwin
These are the steps on adding a new agent in Darwin. Every Department has a set of responsibilities to fill in regards to profiles:
Set up/ Support: Complete steps 1, 2, 3, 4, & 9
Commissions:Complete steps 5 & 7 and audit steps 2, 3, & 4.
Accounting:Complete step 8
Informational purposes: Inventory, Exp Recovery (not used by the Company), Custom Fields (not used by the Company), and History tab
Step 1: Go to People Menu then click the New (+) Button.
Fill in the information:
- Enter First Name and Last Name (do not fill out Company Name)
- Person Type: Agent
- Company: RedwoodDE2
- Office: applicable office
- Account: Pre-set by Accounting

Step 2: People Menu then People Basics tab
- Confirm First Name and Last Name as the Nickname (this will show how agents will be advertised in Dash/Century 21 website)
- Familiar Name: Also known as nickname (doesn’t have to be filled in)
- Fill in Corporate Name: Fill it as the Legal Name or the Business Entity Name (if applicable). If the Corporate Name is different from the First and Last Name field, check the box “use corporate name”. Leave this blank if First and Last Name is the same as Corporate Name (NOTE: Business Entity Name (Corporate Name) must be entered by Commissions only)
- Add Email address: Must default as Redwood email (this is where the campaign emails for commission notices/ overrides/ billing statements are sending to)
- Confirm Type: Agent
- Do not fill: Send Survey box, Source, Lead by, Entity Type, Division, General Notes, Referral, Notes
- Add: Birthday
- Add: Gender & URL
- Add: Mailing Address (Home Address)
-
Add: Phone Number (Mobile or directly line/extension)


Step 3: People Menu then People Links
- Confirm Office (Note: If the agent is switching to another Redwood Office, historical information will automatically fill in the prior office)
- Fill in: Tax ID (Social Security # or Business Enity License Tax ID#) *** For security, only users with “1099 Tax ID” role are the only users who can enter and see tax ID numbers
- 1099 Type: Non-Employee
- Gets 1099? Yes
- Full Time? Yes
- Show on internet? Yes, once the agent is approved to show in Century 21
- Add MLS ID
-
Forte client ID, forte ACH id, forte CC id will be filled in once the information is entered in the Tools tab section.


Step 4: People Menu then Agent Basics
Fill in the following:
- Start Date
- Anniversary Date (this is used for CAP Anniversary Date): when this is filled in, Anniv. start date and end date will auto fill for the CAP anniversary year
- Active: box must be checked
- Exclude: do not check this unless you are excluding agent from Dash submission
- Terminated: only time to fill this out is when an agent leaves the Company
- Career start and brand start: must be the same as Start Date
- Prior Affiliation: select from the dropdown. If agent is brand new, select None
- Recruited by: Always select Agent profile. If recruited by 2 agents with no pre-existing profile, create a profile with name combination as recruiter
- Coached by: add EVP for the office (use EVP’s agent profile)
- Agent Team: select from the dropdown if applicable. Note: Send the agent info to our Century 21 Brand Ambassador -Jodi Myers (Jodi.Meyers@century21.net) to add agent to the team
- Do not fill in:Prior Occupation, Education Level, Coached by, Emergency Contact, insurances, Licenses (should be automated thru api feed)
- Select applicable Preferences
- Add Positions:
Add Sales Associate Position- click + to add new. From the pop-up screen:
- Step 1: select Sales Associate Position (If agent is also an employee, add a new position then select the position applicable to the agent profile)
- Step 2: Select RedwoodDE2 then agent office
- Step 3: Add Start Date (terminated date must be added if agent left the company)
- Step 4: Select the checkbox for Full Time
- Step 5: Click Save


Step 5: People Menu then Commission Tab
- Pull up Prior Production Report (Broker Metrics) in the agent profile, find the last 12 months Sales Volume then multiply by 2.5%. Confirm that it matches the amount on the New Recruit Spreadsheet (approved by Eddie) and enter that amount at the prior production box.
- Look into the Commission Rider& Compensation form and Confirm what split/CAP the agent will be on. Once confirmed, enter the following:
- Select CAP on the plan dropdown
- From the Franchise row: Enter 6.00 under the % percentage column
- From the Company $ row: Enter applicable split under the % percentage column (for example: 30 if agent is on 70/30 split)
- From the Company $ row: Enter applicable dollar amount under the $ cap column (for example: $24,000 CAP)
- From the BPOL row: Enter applicable % under & percentage column depending on agent’s office (.40 for Reston, .31 for Fairfax, .36 for Arlington, .33 for Manassas and Montclair)
- Enter any commissions notes under the box “agent specific commission reminder to pop up before closing:”. This is where the overrides notes or any special billing notes can be entered as well.

- Add: Tracking Totals (this how you can track where the agents are on their totals and what will also print on check stubs)
- Click + add tracking totals
- select: Gross Commission YTD
- click + add to this agent
- Repeat steps 1-3 and select Redwood Agent CAP, Agent Net YTD, Bill Deduction YTD and other applicable tracking totals for the agent.


Step 6: People Menu then Billing
- Add Applicable Recurring Billable Items.
- Agent Commissions for Vouchers: any commission vouchers posted from the property screen will automatically get listed here with following information: id (voucher id), date (close date), $ amount (net paid to agent), description (property address or voucher description)
- Agent Bills for Invoices: any invoices & payments posted against the agent’s profile

Step 7: People Menu then Overrides
Once you confirm who is getting the overrides (per the Comp Agreement), Click the + button beside the overrides (top left) then fill out as below.
***If recruiter is staff (EVP or Recruiter) – based on agent’s first year in the Company
fill out the applies to section:
- side: All
- sort order: 1
- leadsources: All
- TR Type: All
- lead generated by: Agent Generated
fill out criteria section:
- limit $: blank
- limit #: blank
- start date: anniversary start date
- end date: anniversary end date
fill out pay to section:
- pay to: select applicable EVP receiving the bonus (make sure to select the Employee - No 1099 profile as this is where the campaign email is tied to)
- office: select recruited (not recruiter) agent office
- role: select recruiter
- account: select 6-5212 (Recruiter/Manager Production Bonus)
- percentage: applicable % based on Comp Statement
- amount $: leave as blank
- based on: select Company $/ Gross Commission
- click Save

***If EVP has profit share/ retainer bonus- based on 2+ years of agent in the Company
fill out the applies to section:
- side: All
- sort order: 2
- leadsources: All
- TR Type: All
- lead generated by: Agent Generated
fill out criteria section:
- limit $: blank
- limit #: blank
- start date: 2nd year anniversary start date
- end date: leave as blank
fill out pay to section:
- pay to: select applicable EVP receiving the bonus (make sure to select the Employee - No 1099 profile as this is where the campaign email is tied to)
- office: select recruited (not recruiter) agent office
- role: select Manager
- account: select 6-5211 (Manager Profit Share)
- percentage: applicable % based on Comp Statement
- amount $: leave as blank
- based on: select Company $
- click Save

Step 8: People Menu Inventory
Active Properties– all active listings of the agent.
Pending Properties– all transactions for the agent that are currently under contract.
NOTE: Click on the property id to go to the property screen

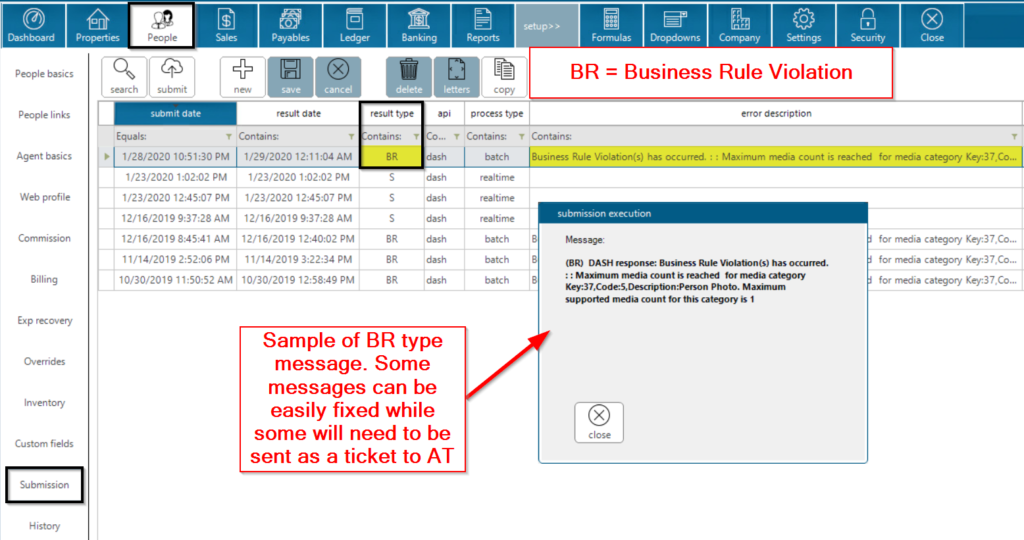
Step 9: People Menu then Submission
Click on the submit button on any tab of the People section to submit changes of the profile from Darwin to Dash. Below are the result types after you click the submit button:
1. S = successful submission. To see the data sent from the successful submission,


2. EX = Excluded from submission. To fix the error: Go to People Menu> Agent Basics> uncheck the Exclude box> Save> Click Submit again.

3. BR = Business Rule Violation. These are errors that will pop up because dash is rejecting information from the agent’s profile. Some messages can be self explanatory (for example: missing email) but some can be complicated. For the complicated errors, send a ticket to AT (support@accounttech.com).
Step 10: People Menu then History
History tab shows the changes made to a person’s profile. It shows the date the change was made, who was the modified user (note: dwinner means system or feed from MLS), what type of change was made, what field in the person’s profile, prior value, and new value.
