.png)
How to add employee to System
Bonnie/Marni needs to fill out this form: redwoodemployee.c21redwood.com to notify Support, Accounting, Processing/Commissions, Marketing of a new employee/contractor. This is the same form for any employee update or exit as well.
Here are the systems new employees need to be set up in.
Email/Google
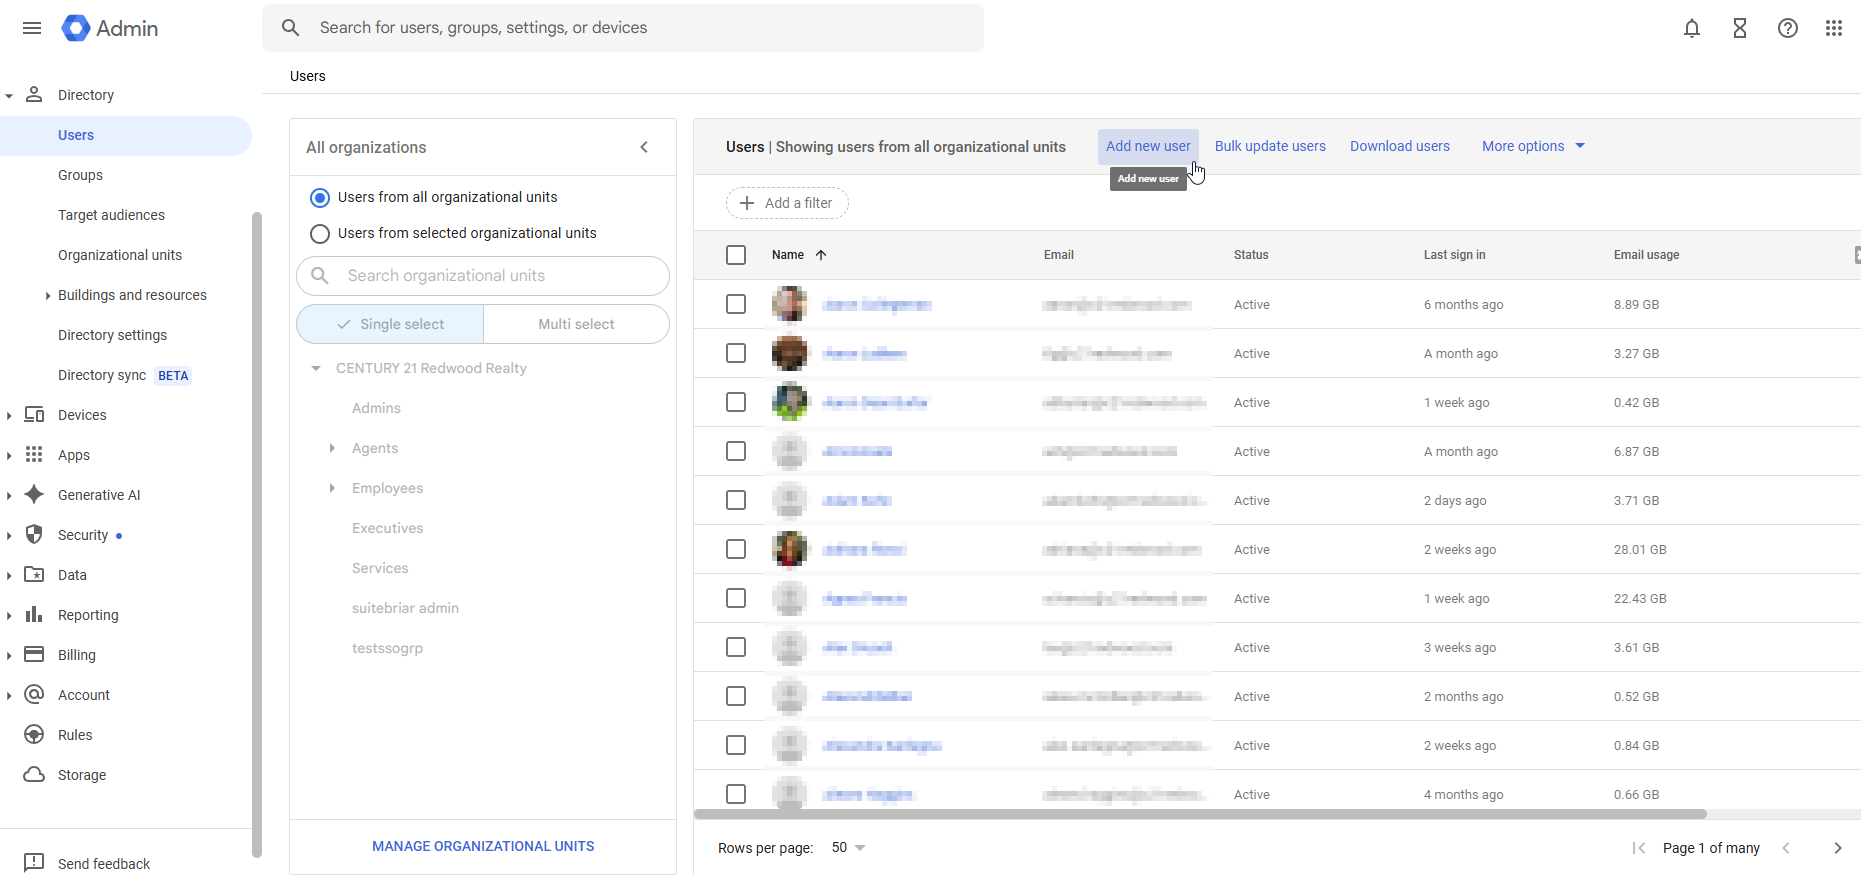
- Login to Google Admin.
-
On the Admin console, go to Main Menu
and click on
Directory > Users (top left corner).
-
At the top of the User List, click Add new user.
- Add the user’s account information.
- First name
- Last name
- Primary email — Use the format first name.last name for the email (e.g. laura.ellis).
- Click Manage user’s password, organizational unit, and profile photo drop-down menu.
-
Organizational unit — Click on the pencil icon
and select Employees.
- Password — Click Create password and enter a generic password and ensure the Ask user to change their password when they sign in checkbox is checked.
- Click ADD NEW USER.
- Assign Licenses.
- Under User details, click Licenses.
- Select the appropriate license whether Frontline Starter or Enterprise Standard
- Note: If there are no more Google licenses available, reach out to Jake/Marni for additional seats.
- Assign Groups.
- Click on the new user’s name to go to their user page.
- Add them to their office group list (e.g. Fredericksburg) and the “All Employees” list.
- Click ADD to confirm.
- Routing Rules.
- From Admin console, navigate to Menu > Apps > Google Workspace > Gmail > Routing or simply search “Routing” in the search bar.
- Scroll down and find System Forwards.
- Click Edit and either replace the exited employee with the new employee or add the new employee’s email address based on their office.
- Click Save to apply the changes.

AccessRedwood
- Go to AccessRedwood.
- Login with your C21Redwood Gmail account by clicking on the blue button.
Note: Be sure to select your Redwood email if you have multiple email accounts saved in your browser.

- Go to Settings and click Add new button on the upper right corner of the page.
- Fill out the User Information Form.
- Full Name
- Redwood Email Address
- Title and Phone Number
- Groups — choose the appropriate Office for Field Staffs OR "Corporate" for Employees
- Roles — always select "Employee"
- Start Date — date the new user started in AccessRedwood
- Display on Dashboard AND Display on Featured Roster Section must be checked off for Field Staffs ONLY
- Book a Meeting Link — if available
- Bio — c21redwood.com bio page if available
- Avatar — approved Headshot
- Click Submit once the information is complete.
Paperless Pipeline
- Login to Paperless Pipeline.
- Click your name in the upper right corner, then Admin / Settings from the dropdown menu.
- Click Manage Users (left -hand side menu). This section will display all active users.
- Click Add User icon at the top of the screen.
- Fill out the User Information Form.
- First Name
- Last Name
- Email Address
- Phone (optional)
- Primary Location — Select the office or location the user will be associated with.
- Role — Choose the appropriate role for the user (e.g. Executive Vice President, Office Manager, etc.).
- Create a temporary password for the new user. Suggestion: Use a temporary password like “Redwood21!” which prompts the user to reset it upon first login.
- Set User Permissions: Check the following options based on the user’s role and responsibilities.
- Send daily email with upcoming tasks to this user.
- Include this user in the staff recipients section of Notes.
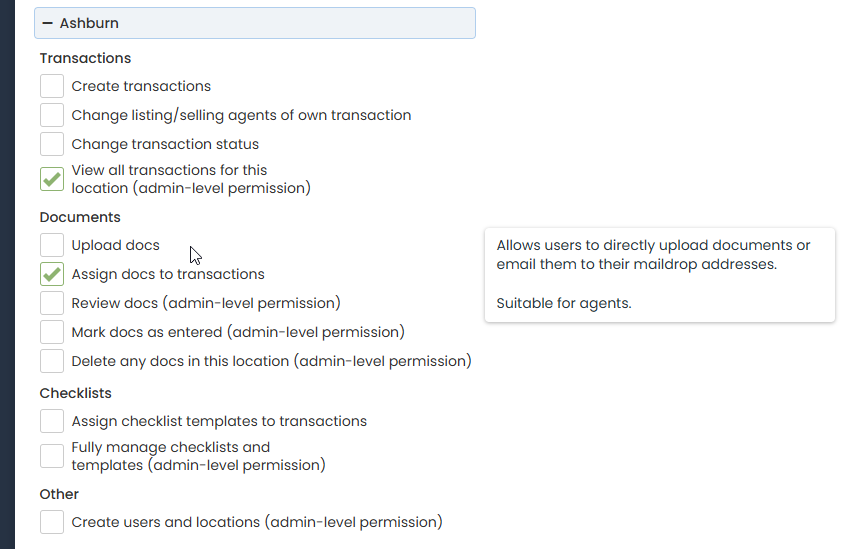
- Customizing Permissions for Office access (expand the location if necessary).
- Determine the permissions required and check the boxes next to the permissions you would like to grant based on the user’s role and office location.
-
Learn about each permission by hovering over the item and viewing the help text to the right.
- Customizing Permissions for Multiple Offices.
- If the user needs access to multiple offices (e.g. processor), repeat the permission setup for each office they are associated with.
- Ensure all necessary permissions are selected for each office.
- After configuring permissions, click Add User button to save the user.

Note: *Inform the user that the setup process is straightforward and adjustments can be made easily if needed in the future.
- After saving, review the permissions to ensure they are correctly set up for the user’s role and responsibilities.
- Accessing User Accounts: If needed, show the user their account settings to confirm permissions and access.
- Making Adjustments: if any changes are necessary later on
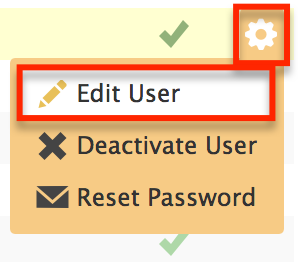
- Navigate back to the Manage Users section.
- Locate the user by name, once found click on the wheel to the right of their name, then Edit User.
-
Changes could include correcting spelling errors in names or adjusting permissions, etc.
- Once all necessary adjustments are made, confirm with the user that their account setup is complete.
- Offer assistance and address any questions or concerns the user may have regarding their account setup or permissions.
Zipforms
- Login to Zipforms.
- Click on the Admin tab, then click Users.
- Click + New button on the top left.
- Carefully input the user’s details.
- First Name
- Last Name
- User Name (Redwood email)
- Email Address (Redwood email)
- Click Next.
- Assigning User Role.
- Determine the appropriate user role based on the individual’s responsibilities within the organization.
- Select in the drop-down menu at the top whether the user is an Agent, Location Administrator, Brokerage Administrator or Transaction Administrator.
- Click Next at the bottom to continue.
- Selecting/Assigning Office.
- Choose the specific office or location associated with the user’s role. If there are multiple offices available, select the one that aligns with their responsibilities.
- Ensure to designate the selected office as the default office on the right for the user to streamline their access to relevant resources.
- Click Next to continue.
- Choose C21RE (Century 21 Redwood Realty) and BRHT (Bright MLS) Libraries.
- Check the user’s geographical location and select the corresponding real estate board association from the available options. Provide clarity on which association applies to their state, such as “NVAR” for Virginia and “GCCAR DC” for Washington, D.C, and MDAR/MDARBF for Maryland.
- Click Next.
- Check Transaction Management System (TMS) *it should be checked for everybody.
- Click Next twice to continue.
- Click Save.
Note:
- Email Notification:
- Users will receive an email with instructions on setting up their Zipforms account. Reiterate the significance of following these instructions promptly.
- Encourage them to check their email and proceed with the account setup process.
- Making Adjustments: if any changes are necessary later on
- Navigate back to the Search bar inside Admin Tools to search for their name.
- Locate the user by name, click on the drop-down icon, and click Edit. Make necessary adjustments as needed.
- Changes could include correcting spelling errors in names or adjusting permissions.
Docusign
- Login to DocuSign.
- Click on the Settings tab at the top.
- Click Users on the left-hand side.
- Select Add User.
- Input the Redwood email address of the user, then click Next.
- Fill in the required details:
- Full Name
- Job Title — Specify the job title or role of the user within your organization.
- Company — Enter “Century 21 Redwood Realty”.
- Click Next to move forward in the process.
- If prompted for an access code, leave the field blank.
- Click Next.
- Select Permission Profile — DS Sender.
- Click Add User.
Note:
- Confirmation and Email Notification:
- Upon successful completion, a confirmation message should appear indicating that the user has been added.
- The user will receive an email notification containing instructions to set up their DocuSign account.
- Editing User Details:
- If there is a need to edit user details after adding them, you can access the user’s profile from the User Management section.
- Click on the user’s name to access their profile, where you can make necessary edits or updates.
- Email Address Correction:
- It’s crucial to ensure the accuracy of the email address provided during user addition as it cannot be changed by the administrator once the user is added.
- If an email address needs correction, the user will need to log into their account with their old email address and update it in their settings tab with their new email address.
Slack
- Go to https://c21redwood.slack.com/admin.
- Click Manage members under ADMINISTRATION menu.
- Select Invite People (upper right corner).
- Enter the new person’s email address.
- Hit Send, then Done.
– The new user will receive an email invitation to join Slack.
Marketing Studio 2.0
- Send an email to Bobby at Breakthrough Broker (bobby@breakthroughbroker.com) and he will handle the rest of the setup.
Use the following template:
Subject: New User Setup as Admin
Hi Bobby,
We have a new user that needs to be set up as an admin on our accounts.
The user is [Full Name], and his/her email is [Email Address].
Thank you!
Infinity Cloud
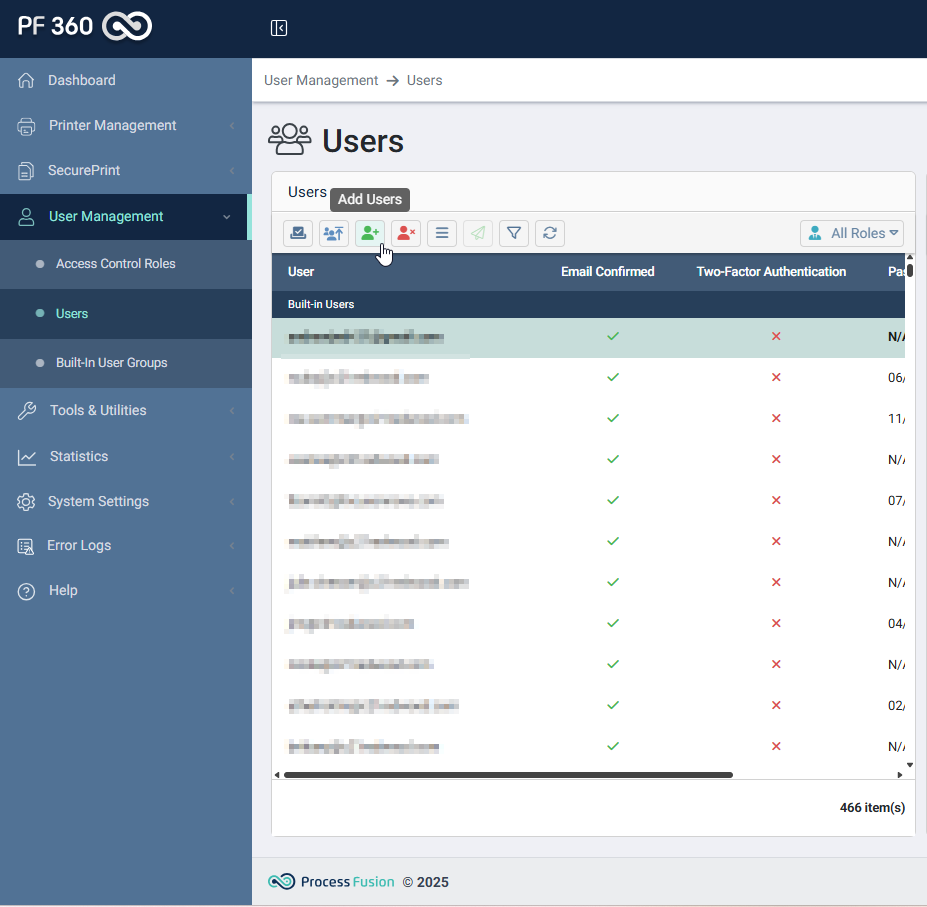
- Login to Infinity Cloud.
- On the dashboard, look for the User Management section on the left-hand corner.
- Click Users to access the user management interface.
-
Click the plus button (+) to add a new user.
- Enter the new employee’s email address in the form, then click Next.
- Select End User from the list of roles.
- Click Add to confirm the role assignment.
- Click Next.
- Click Create to finalize the setup of the new user.

– A confirmation message will appear once the user has been successfully created.
Darwin
- Tag Processing Team on the Onboarding board in Monday.com created for the new employee.
Comstar
- Access C21 Add_Remove Change Form.
- Fill out the Basic User Information form.
- Add or Remove — ADD
- First Name
- Last Name
- Location
- Cell Phone Number
- Send an email to support@comstar-usa.com requesting to add a phone extension for a new user.
Signature
- Open the Signature Manager doc that contains the standardized email signature for employees.
- Enter the new employee’s details in the appropriate fields.
- Email Address
- Full name
- Position
- Office Location
- Company — CENTURY 21 Redwood Realty
- Office number — can be found on Century 21 Redwood website Our Offices page.
- Website — c21redwood.com
Note:
- Ensure that the new employee’s signature is consistent with the template.
- Make any necessary adjustments to align with the organization’s branding guidelines.
Moo
- Log In to Moo.
- On the dashboard, Click People tab located on the left-hand side.
- Click on Add more people button, then select Invite a Person.
- Enter Employee Details:
- First and Last name
- Email Address
- Role — Assign the role “Employee”
- Click Send Invite.
Note:
- Ensure the new employee receives the invitation and completes their Moo account setup.
- Assist them with any questions or issues during the setup process.
Luxury Presence
- Login to Luxury Presence.
- Go to Content, then click Agents.
- Click Add New and fill out the following:
- First Name
- Last Name
- Email Address
- Position Title
- Tags — type in “employee” so they don’t come up to Our Agents page.
- Address — office address.
- Phone Number — office phone number.
- Website URL — office direct URL.
- Click Save once done.
Marketplace Notification List
- Refer to this guide to update the C21 Marketplace notification list.
Cloud CMA
- Refer to this guide to log in and add new user to Cloud CMA.
Social Bay
- Login to Social Bay.
- Go to User Management.
- Click Invite New Agent, then fill out the following fields.
- Email Address
- First Name
- Last Name
- Phone Number
- Group — office location
- User Type — Agent or Broker
- Click Send Invitation.
Employee Roster Monday board
- Go to Employee Roster board.
- Add the user with the following information:
- Last Name, First Name
- Status — Active
- Birthday (mm/yy)
- Hire Date (mm/dd/yyyy) - you may get the info from New Employee Onboarding email or Darwin
- Birthday Month
- Hire Date Month
- Department
- Title
- Redwood Email
- For Field only
- Contact no.
- Darwin Clouse Username
- Website Link
- Added to LP
- LP About Link
- Main Office
- For Field only