.png)
Processing Guide: Sale- Seller Side (From Active to “Ready to Close”)
This is a step by step instructions for Corporate Processors on how to process a file in paperless and Darwin from an Active Listing to “Ready to Close” status.
Step 1: Assign Documents to a Paperless Pipeline File / Creation of new Transaction File
Select documents from the Unassigned tab in Paperless Pipeline then search the client names in the [Search Transaction] bar. To ensure a duplicate file is not created, always search for an existing transaction to assign the document to and click “Assign”.
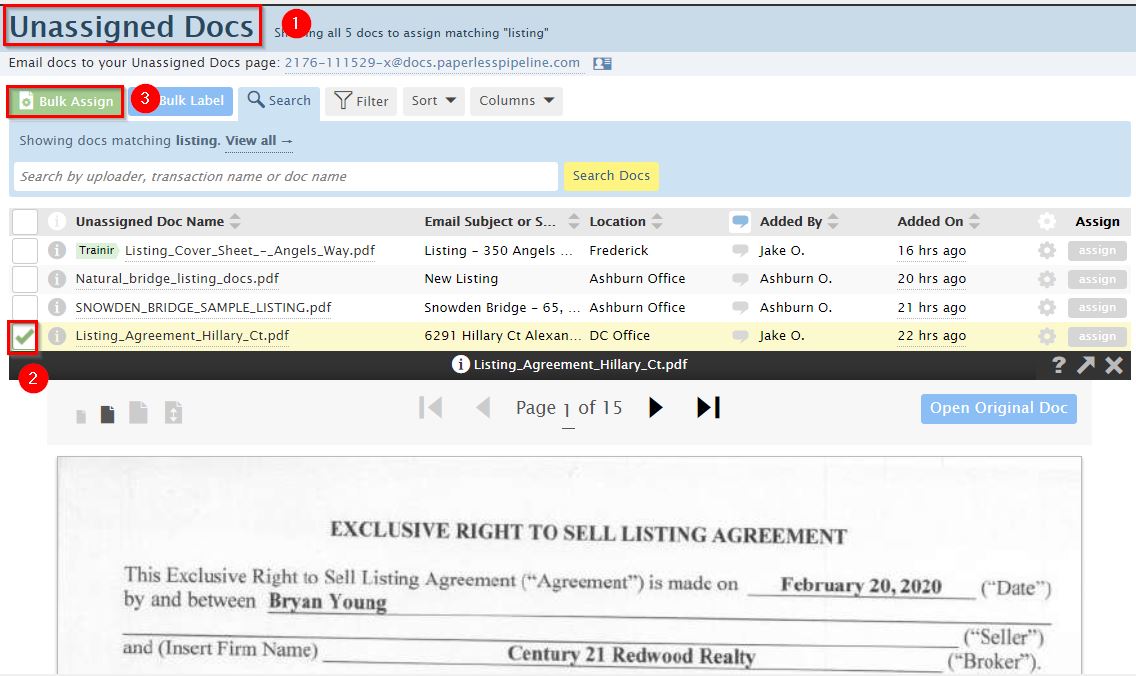
If there is not a transaction file already create, click “Add Transaction” create a new file.
![]()
Step 2: Enter the Critical Data Fields on an Active Listing File
Enter the following Critical Data fields that apply:
Note: You can always update existing information and/ or add additional information throughout transaction. Some fields will be left blank depending on the status of the transaction.
- Location: Select the office location in which the agent is under.
- Transaction Name / Property Address: Add the full property address indicated on the listing agreement
- Status: Select the Active Listing status that matches the state of the property. (i.e., “VA- Active Listing, MD- Active Listing, DC-Active Listing, WV-Active Listing)
- Label: A transaction label is used to categorize a transaction (for example, Residential, Land, New Construction, Commercial, etc.)
- MLS #: Add the MLS Number if the property is listed in Bright MLS
- Listing Date: Enter the date the property is active on the market (per marketing paragraph in the listing agreement)
- Expiration Date: The transaction status will automatically change transactions to an “Expired/Withdrawn” status if the listing is still in active status after their expiration date has passed. Automatic expiration date is 90 days (per expiration paragraph in the listing agreement)
- Seller Name: Enter the name(s) of clients selling the home
- List Price: Enter the current list price of the home (per listing agreement)
- darwin Prop ID: If the property is listed in Bright, the listing will push to darwin. Once the listing is in darwin, the darwin Prop ID will be available.
- Year Built/Home Built Prior to 1978: Indicate whether the home was built prior to 1978 or not. This will determine if the Lead Disclosure Form is needed for the transaction. This information can be found in Bright MLS or Listing Agreement.
- More Info: Use this section to add notes about the vendors involve in the transaction and the seller’s contact information.
- Lender/Mortgage Company:
- Loan Officer:
- Escrow Agent:
- Settlement Company:
- Insurance Broker:
- Home Warranty Company:
- Client Email address:
- Client Phone number:
- Admin Info: Add notes in this section that is only visible for internal staff.
- Redwood Commission: Enter the commission percentage as indicated in the listing agreement
- Additional Commission Paid by: Indicate who is paying the Admin Fee and how much per the listing agreement
- eRelocation Result: Indicate if the Lead is searchable in eRelocation. See the Verifying Leads in eRelocation for more information.
- TC File?: Indicate if the agent is using Transaction Concierge Services
- Assign Agent: Assign all Redwood agents involved in the transaction to give them access and fully visibility to the file and documents.
- Outside (Co-op) Agents: When agents outside your company are involved in a transaction, you can add their information toward the bottom of the Edit Transaction page. This information is for reference only; these agents won’t have access to the transaction.
![]()
![]()
To save the new transaction file click [Add Transaction] at bottom of the screen
![]()
Step 3: Organize Documents
Once the documents are added to the file, follow the steps below:
Step 1: Label each document with appropriate document name (once you start typing the doc name, the correct label will auto-populate)
Step 2: Break apart documents that were sent to Paperless Pipeline as one large file.
Step 3: Select Category for each document (Office docs, Listing Docs, Sale Docs, Buyer Docs, Public Doc, Private docs).
Office Docs: Sensitive Information forms/deposits. Agents cannot see documents in this category
- Accounting Sheet
Buyer Docs: Forms signed by the purchaser
- Exclusive Right to Rep Buyer Agreement
- Affiliated Business Agreement
- Lender Letter
- DPOR Notice to Buyer
- Understanding Your Rights Under the VA Condominium Act/Property Owner’s Association Act
Sales Docs: Forms signed by both seller and purchaser
- Sales Contract
- Finance Contingency Addendum
- Contract Addendums
- Residential Property Disclosure
Listing Docs: Forms signed by the seller(s).
- Exclusive Right to List Agreement
- Affiliated Business Agreement
- MLS Full Listing
- Residential Property Disclosure – signed by Seller
Public Docs:
- Deposit Confirmation of Commission Check
- Copy of Commission Check
- Deposit Confirmation of Earnest Money
- Copy of Earnest money check
- Cover Sheet
- Settlement Statement / Preliminary ALTA
- Referral Agreements
- Credit Letter
- EMD Confirmation letter
- Final Walk Through Inspections Form
Step 4: Send Document(s) for Broker Signature
- Only send Complete Documents to your Broker/Manager for signature. Make sure that the document is not missing any pages or customer signatures/initials prior to sending
- A signed copy of the document will be automatically sent to Paperless after it has been signed by the broker.
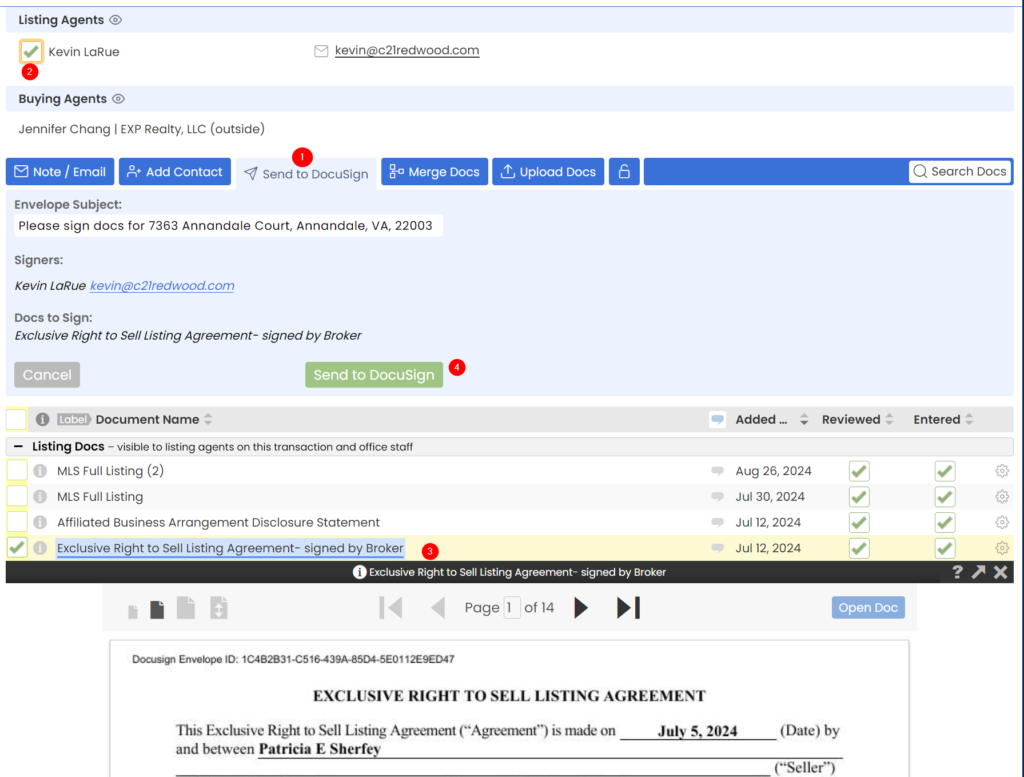
Step by Step Instructions for DocuSign:
- Click the “Send to Docusign” tab in Paperless
- Select the name of the agent
- Select the document that needs to be signed
- Click the “Send to Docusign” button.
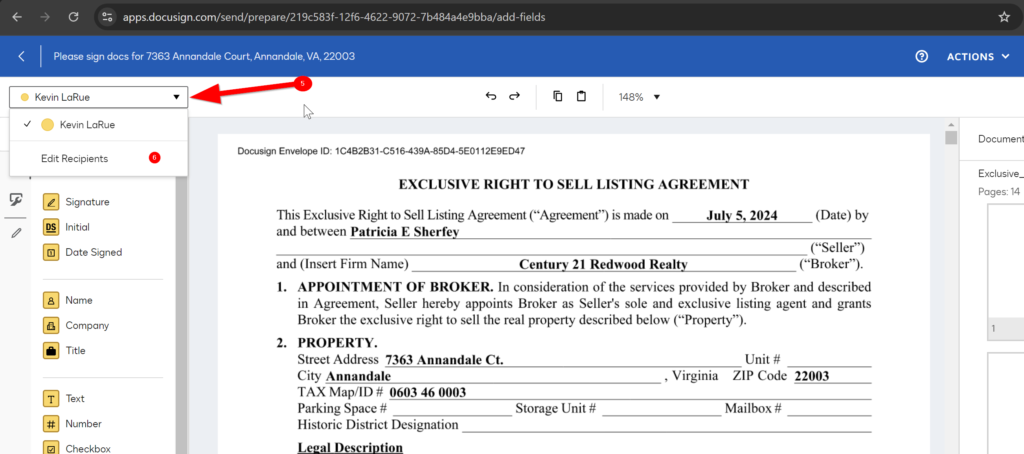
- You will be redirected to Docusign. Click the arrow beside the name of the Agent.
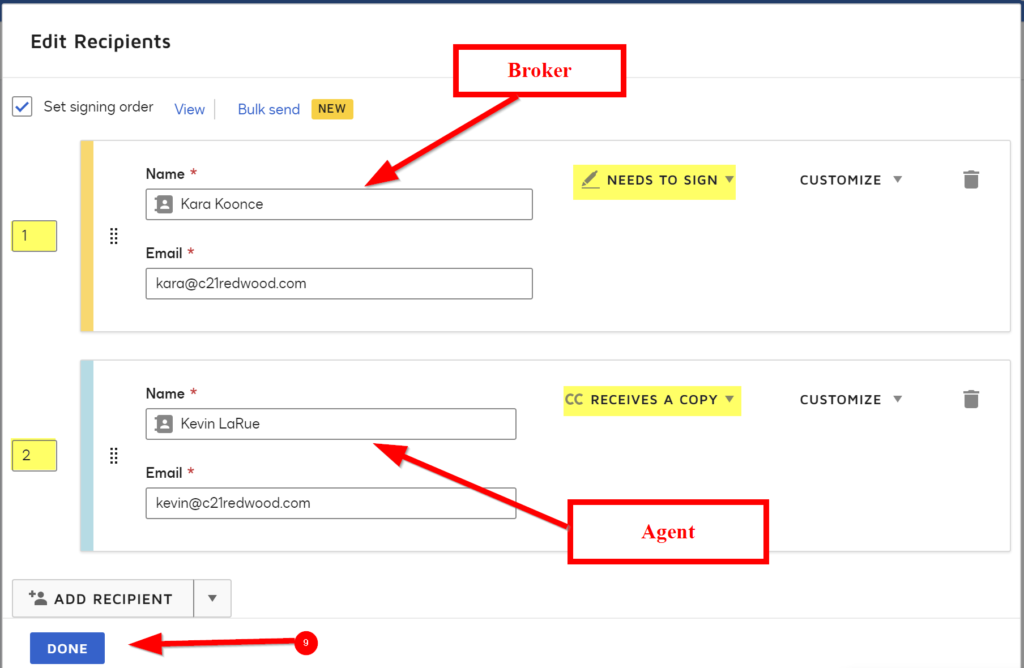
- Click the “Edit Recipients”
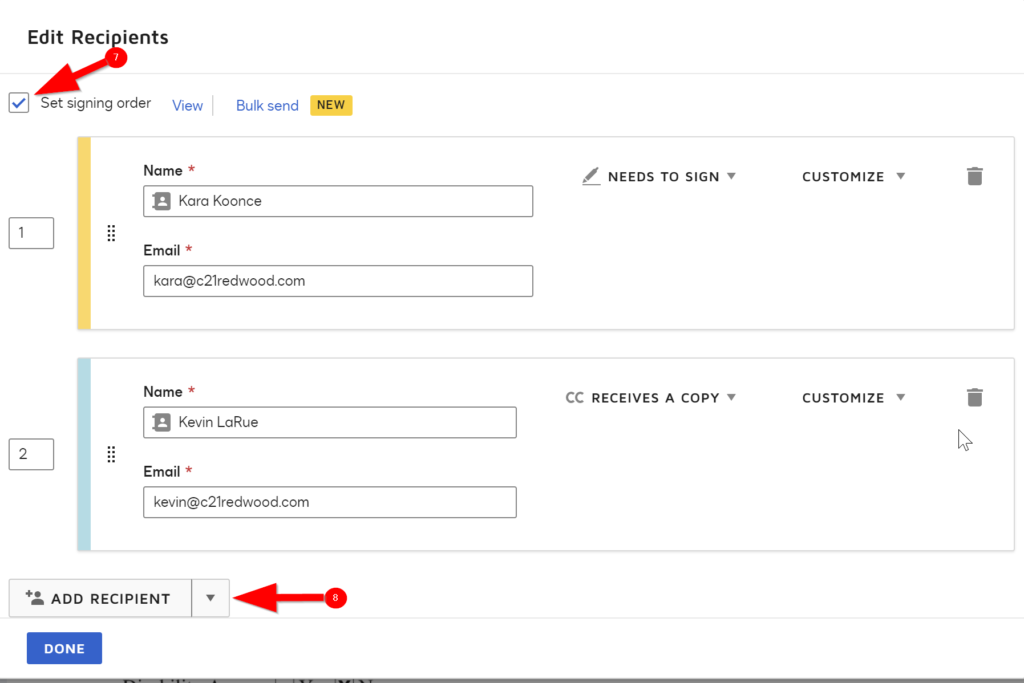
- Check “Set Signing Order”
- Add Recipients
- (1) Broker – select Needs to sign
- (2) Agent(s) – select Received a Copy
- Click Done
- Add the signature field and the Date Signed field.
- Click “Send.”
Step 5: Process the Contract in Paperless Pipeline
- Add contract to file.
- Update critical data fields to include the contract information that applies.
- Break apart the documents if received as a package.
- Relabel Document names if applicable.
- Check off items received on the checklist applied to the transaction file. Remove any items that do not apply. Add additional items to the checklist if applicable; Disclosure of Brokerage Relationship for Unrepresented Party, Disclosure of Dual/Designated Agent, etc.
-
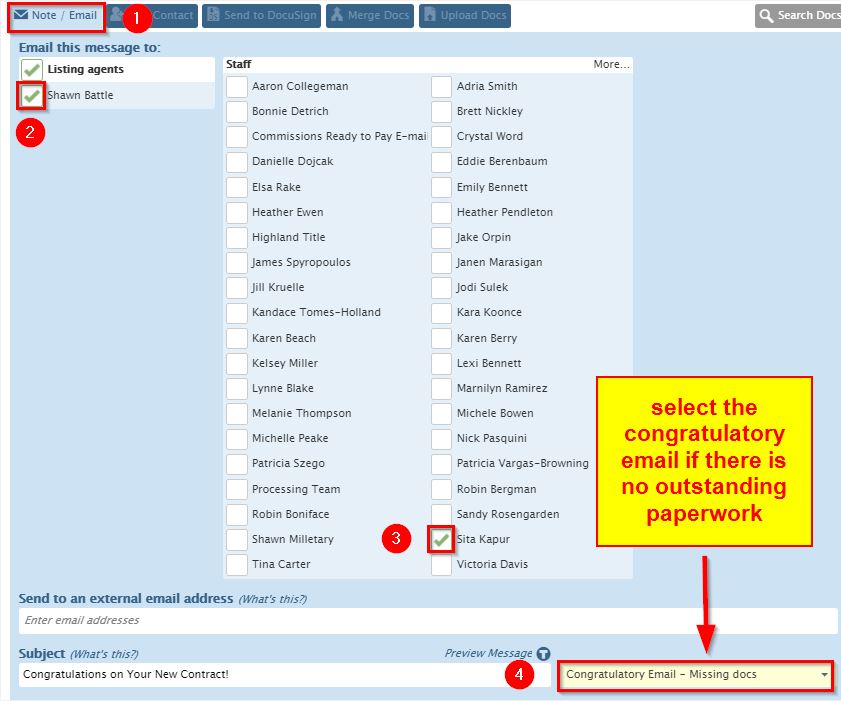
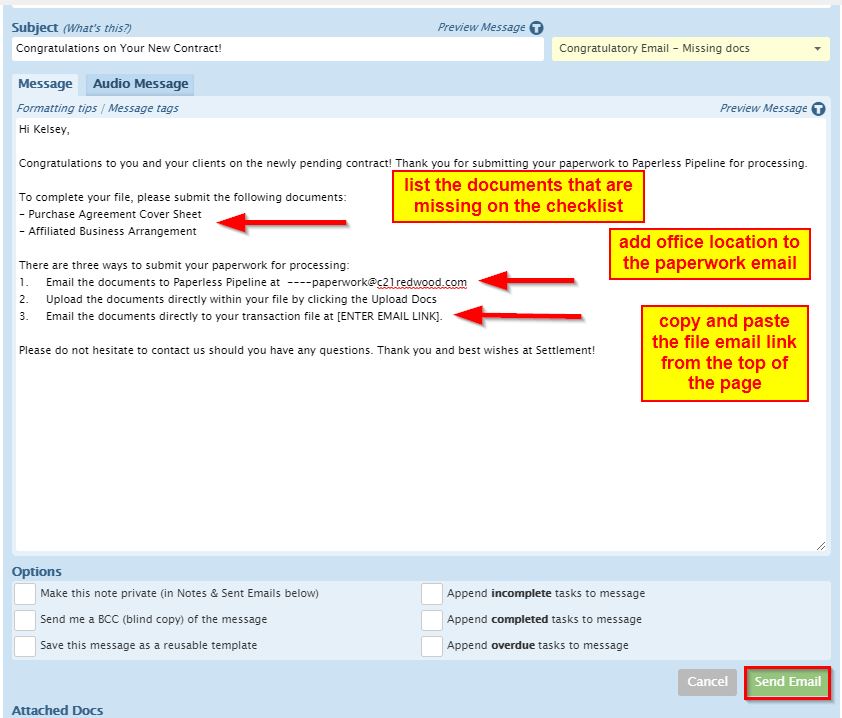
Send a congratulatory email to the Agent and CC the office EVP to include a list of outstanding paperwork and due date of the escrow (if applicable). Please note to fill in the office email address and Paperless Pipeline email link.
Special Transactions:
- Relocation Transactions: Add the “Incoming Referral (We pay referral fee to Outside Broker – Relo/ B2B)” checklist and add Relocation Corporate as an agent.
- Referral Transactions: Add the “Incoming Referral (We pay referral fee to Outside Broker – Relo/ B2B)” checklist.
- New Construction Transactions: add the New Construction checklist and set the closing date to 6 months post ratification date if the closing date is not specified on the contract.
- Short Sale Transactions: Add the Short Sale checklist and set the closing date to 6 months post ratification date.
- Is the agent using Transaction Concierge? Refer to the C21 Redwood Agent to see which transaction coordinator will be working on this file and should be added to the file. Add the property address to the TC Tracker spreadsheet.
- Post Settlement Occupancy (if Redwood is holding Deposit) Add the Post Settlement Occupancy Agreement checklist.
Helpful Tips:
- Delete the forms on the checklist that do not apply to the transaction.
- If the wrong checklist has been applied, delete and add correct checklist from the drop-down menu.
- Check the Teams Summary Spreadsheet and the Agent Profile in Darwin to determine if the agent is on a team, and follow the provided guidance on how to process accordingly.
- Every Contract submitted to Paperless Pipeline needs to be added and processed into Darwin.
Step 6: Procedure to Request Missing Paperwork
Requests for Missing Paperwork should be sent to agents when the transaction is initially submitted to the office. Please do NOT wait until settlement to request missing documents!
Procedure to Request Missing Paperwork
In the event a missing document is identified the following procedure should be followed:
- First Attempt – Send Note: Processor should contact agent via Paperless Pipeline Note. This should be a friendly note using templates available below
- Second Attempt – Note: Processor should contact the agent via Paperless Pipeline copying Managing Broker.
- If No Response – Principal Broker to Get Involved: Processor to contact their Managing Broker to reach out to the agent regarding the missing Paperwork copying the Principal Broker
Decision to Excuse Missing Paperwork
- Only the Managing Broker or Principal Broker can make a decision to excuse a Paperwork Requirement for a Transaction
- In the event a Paperwork requirement is excused, the following items must be completed:
- The excused paperwork requirement must be deleted from the Checklist for the Transaction in Paperless Pipeline
- The Processor to create a Note in Paperless Pipeline or forward the email of the Managing Broker or Principal Broker documenting that the paperwork is waived
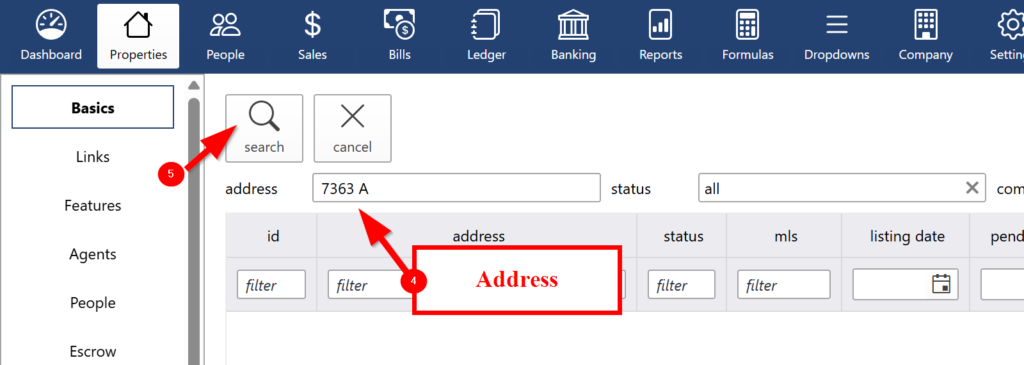
Step 7: Open Property file in Darwin
Every contract submitted and process in Paperless Pipeline, must be added to Darwin.
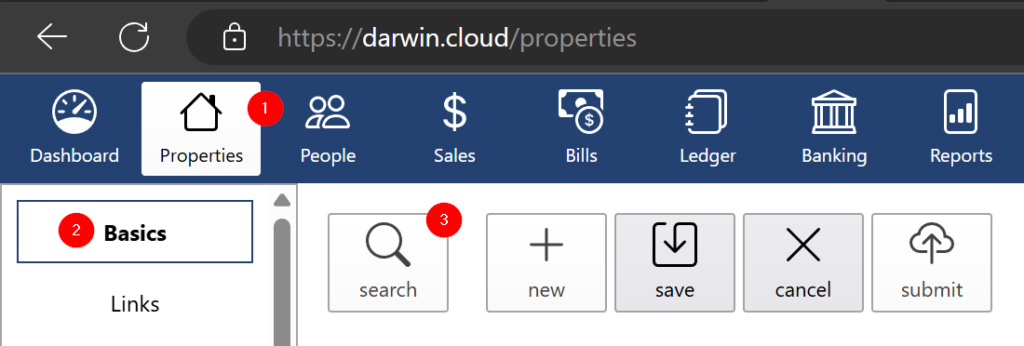
- Go to darwin
- Click the the Properties tab
- Go to Basics
- Enter the Address
- Click Search.
If the property is a Redwood listing and was entered into Bright, the property will have a file in Darwin.
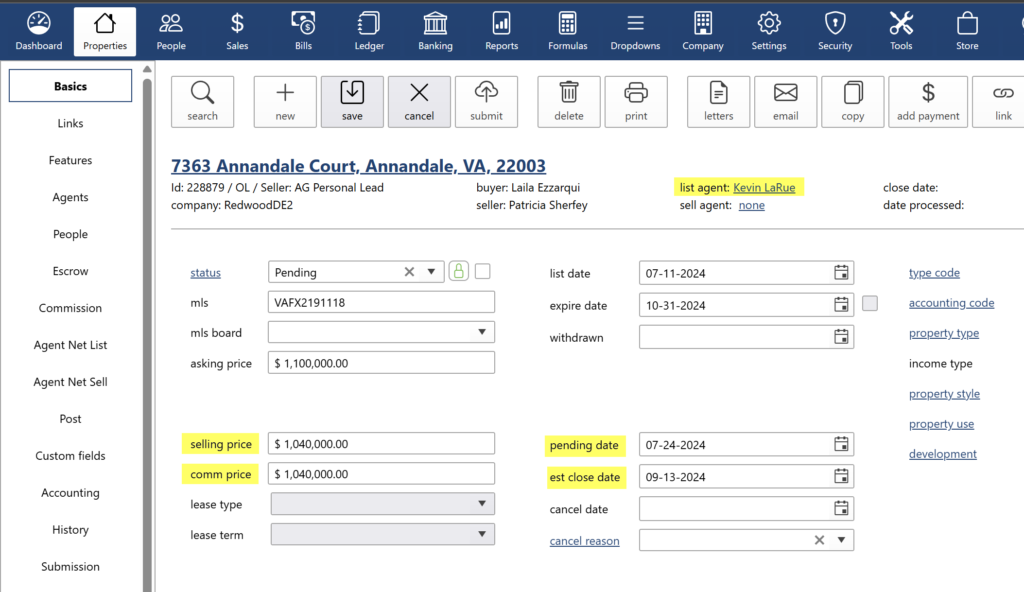
Step 8: Process Contract Information in Darwin
- Property Basics tab:
- Add the selling price (Page 1 of of sales contract)
- The commission price will automatically change to match the Selling Price
- The Pending Date and Estimated Close Date are automatically added from the feed from Bright MLS. Please double-check if the dates match those in the contract. If there is a discrepancy, follow whatever is stated in the contract or addendum (if applicable).
-
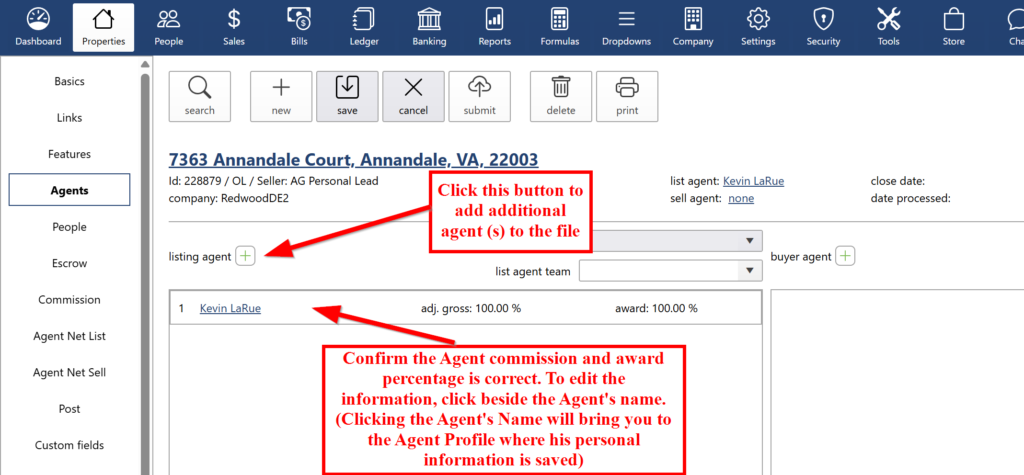
After making changes, click the “Save” button.
-
Go to the Agents tab to confirm the agent information is correct. This is where you will add any additional agents if applicable.
- Go to People tab. This is where you will enter the Buyer(s), Seller(s) and vendors (Lender & Title Company), Financing Type.
- Seller info: Search if there is already an existing entry for the seller. You can use the seller’s email address and phone number as a basis when determining if it’s the same person. If the seller is not in the system yet, add the seller as a new client. Enter Lead Source (Agent Generated or Office Generated) and Lead by (i.e., Personal Lead, Agent Generated / Relocation Cartus, Company Generated), add the email address and phone number.
Note: If there is already an existing entry for the seller, and the new transaction has a different Lead Source and Lead By, we must never change the existing entry. Instead, we must create a new one.
- Buyer info: Add buyer as a new client.
- Title Company: Enter the Title Company based on the information in the contract. If there is no Title Company Information in the contract, select “Waiting for Title Company Info.” The information will be updated once we receive the information.
- Lender: Enter the information based on the Lender Letter of Coversheet. If the information is not available, select “Waiting for Lender Info.”
- Financing Type: Enter the Financing Type based on the contract
(For rentals: Enter “Rental- No Title Company”and “Rental- No Lender” )
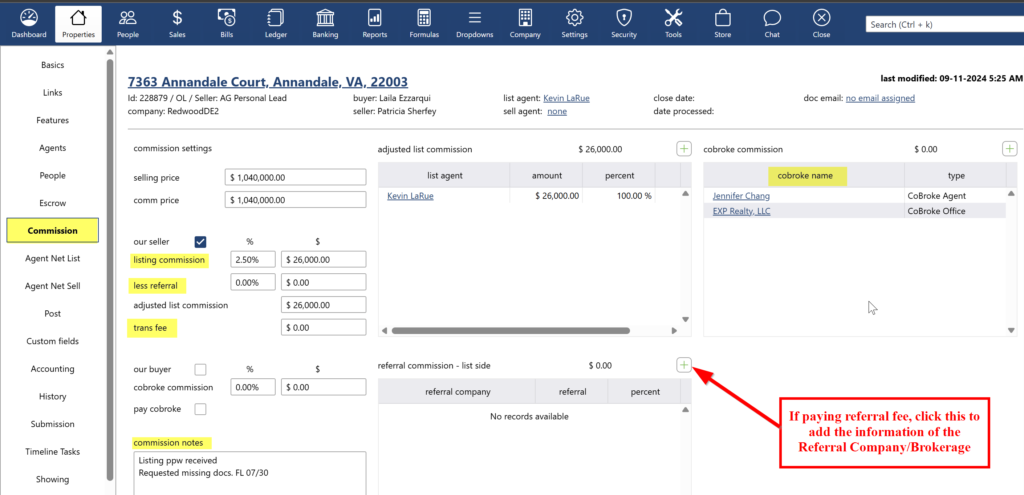
6. Go to Commission tab to enter the commission % for our agent and add the Transaction Fee in the Transaction Fee box if we are collecting the funds from the client. Enter referral % if applicable. Add the Co-Broke Name and Co-Broke Agent.
Add any special commission instructions or transaction status notes in the commission notes box.
Step 9: Marking Paperless Pipeline File "Ready to Pay"
When the Paperless Pipeline file has been complete (all required documents have been submitted and we received the commission funds and Settlement Statement) it is time get the file ready for pay out.
- Audit the Paperless Pipeline file to ensure we have received all of the required forms. The Checklist should be complete and the file will turn green once the checklist is 100% complete.
- Ensure the transaction information is correct in the file and matches the information on the Settlement State. (i.e., Buyer/seller names, closing date, sales price, lender, title company and, home warranty (if available), Insurance Company (if applicable), commission amount on ALTA matches the amount we received)
- Change Status from Purchase Pending to “Ready to Pay”
Step 10: Marking Darwin File "Ready to Close"
When the Paperless Pipeline file is complete or the receipt minimum of the coversheet, Accounting Sheet or Referral Agreement (if applicable), Primary Residence/Investment Property Submission Form (if applicable) and Final Settlement Statement, audit the Paperless and Darwin files to ensure all of the critical data fields are complete and matches the information on the Settlement Statement:
Property Basic Screen
- Property Address – matches ALTA
- Selling Price- – matches ALTA
- Closing Date – matches ALTA
People screen
- Buyer Name(s) – matches ALTA
- Seller Name(s) – Matches ALTA (Make sure that the seller’s address is added if it’s available on the ALTA or Listing Agreement)
- Lead Source – confirm in eRelocation (See the Verifying Leads in eRelocation guide for more information)
Vendor/Partner List
- Lender – matches ALTA
- Title Company for Buyer side
- Add Homeowners Insurance & Home Warranty (this information is to be entered once the ALTA is received) – if the information is not provided on the ALTA, enter ‘No Info on the ALTA’ for both.
- Add the Loan Amount
Commission Screen
- Commission matches the ALTA and the Listing Agreement.
- If the commission on the ALTA does not match the commission in the Listing Agreement, reach out to the agent to confirm if there have been any changes in the agreed commission. If there have been, request the applicable listing agreement amendment.
- If the Agent has confirmed that there are no changes on the agreed commission but the commission on the ALTA is incorrect, reach out to the Title Company to request the corrected ALTA.
- $200.00, $395.00 or $495.00 additional commission is added – if applicable. No fee Freddie Mac List side, rentals and some Relo leads
- Make sure the Referral Percentage is indicated, and the Referring Brokerage/Company is added – If applicable.
Lastly, change status from pending to Ready to Close.
- Go back to the Property Basics screen and change Status from Pending to “Ready to Pay” and click save.